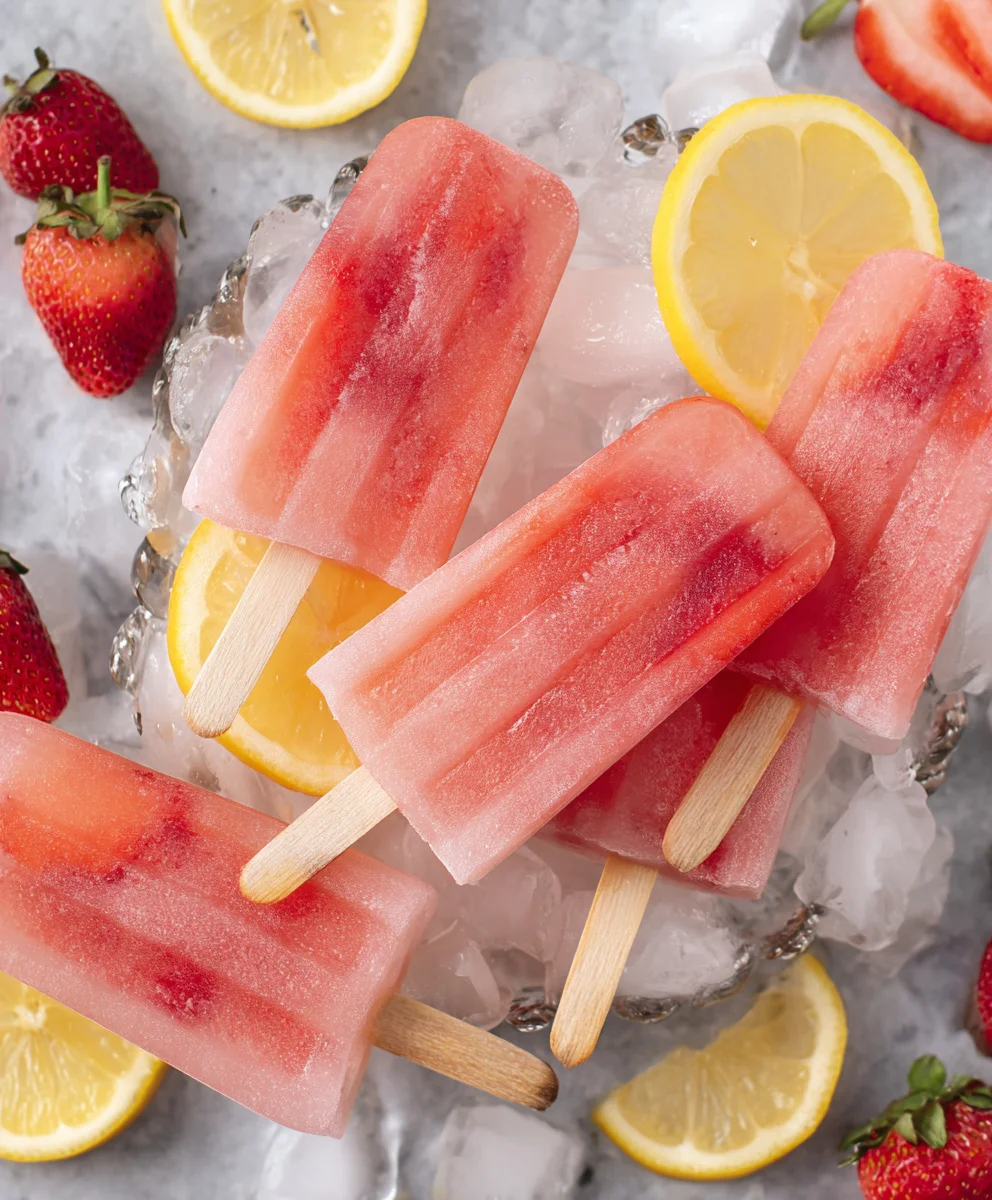
Strawberry Lemonade Popsicles-Sweet & Tart Refreshment
Strawberry Lemonade Popsicles are more than just a frozen treat; they’re a vibrant burst of sunshine and nostalgia, captured in a delightful, icy form. On those sweltering summer days when the heat feels relentless, what could be more refreshing than a homemade Strawberry Lemonade Popsicle? The magic lies in their perfect balance: the sweet, ripe essence of fresh strawberries mingling with the zesty, invigorating tang of fresh lemon juice. It’s a classic flavor combination that instantly transports us back to carefree childhood afternoons and lazy backyard gatherings. What truly makes these Strawberry Lemonade Popsicles special is their simplicity and the ability to customize them. You control the sweetness, the tartness, and the quality of ingredients, ensuring a pure, unadulterated taste of summer that’s both incredibly satisfying and wonderfully wholesome. Get ready to create a batch that will have everyone beggin extractg for more!

Ingredients:
- 1 container (approx. 59 fluid ounces) Simply Lemonade
- 1 cup fresh strawberries, washed, hulled, and diced
- 1 tablespoon granulated sugar
Preparing the Strawberry Lemonade Base
Step 1: Gentle Sweetening of the Strawberries
The first step in creating our vibrant Strawberry Lemonade Popsicles is to prepare the strawberries. Begin extract by washing your fresh strawberries thoroughly under cool running water to remove any dirt or debris. Once they are clean, carefully remove the green leafy tops (hulling them). For these popsicles, we want small, manageable pieces of strawberry, so dice the hulled strawberries into small, bite-sized pieces. Aim for a dice that is about 1/4 inch in size. This ensures that you get a delightful burst of strawberry in every lick of your popsicle. In a small bowl, place the diced strawberries. Now, add the 1 tablespoon of granulated sugar to the diced strawberries. Gently toss the strawberries and sugar together. The sugargin extractll begin to draw out some of the natural juices from the strawberries, creating a slightly syrupy consistency. This not only adds a touch more sweetness but also helps to infuse the strawberries with the sugar, enhancing their flavor. Let this mixture sit for about 10-15 minutes while you prepare the lemonade. This short maceration period is key to unlocking the full strawberry flavor and creating a more intense and delicious popsicle.
Step 2: Combining Lemonade and Sweetened Strawberries
Once your strawberries have had a chance to macerate with the sugar, it’s time to combine them with the lemonade. Open your container of Simply Lemonade. Pour the entire contents into a larger pitcher or mixing bowl. The convenience of using a pre-made lemonade like Simply Lemonade is that it’s already perfectly balanced for sweetness and tartness, making our popsicle-making process wonderfully simple. Now, carefully add the sugar-sweetened diced strawberries, along with any accumulated juices, into the pitcher of lemonade. Stir gently to combine everything. You want to distribute the strawberries evenly throughout the lemonade, ensuring that each popsicle will have delicious fruity bits. Avoid over-stirring at this stage, as we don’t want to break down the strawberry pieces too much. The goal is to have distinct, flavorful pieces of fruit suspended in the refreshing lemonade. Give it a good stir for about 30 seconds to ensure the sugar from the strawberries is well incorporated into the lemonade.
Assembling and Freezing the Popsicles
Step 3: Filling the Popsicle Molds
With your strawberry lemonade mixture ready, it’s time to fill your popsicle molds. If you are using standard popsicle molds, make sure they are clean and dry. You can also use small paper or plastic cups if you don’t have dedicated molds. Carefully pour the strawberry lemonade mixture into each mold. Try to get an even distribution of strawberries in each one. You can use a spoon to gently nudge any stray strawberries into the molds if needed. Be careful not to overfill the molds, as the liquid will expand slightly when it freezes. Leave a small space at the top, about 1/4 inch, to allow for this expansion. If you are using molds that come with sticks, insert the sticks into the center of each mold as you fill them. If you are using cups, you can insert popsicle sticks once the popsicles are partially frozen, about 1-2 hours into the freezing process, to ensure they stand up straight.
Step 4: The Crucial Freezing Process
Now comes the most important part: freezing! Carefully place your filled popsicle molds onto a flat surface in your freezer. This is essential to ensure that the popsicles freeze evenly and don’t develop an uneven shape. You want to ensure that the freezer shelf is level before you place them. Allow the popsicles to freeze completely. This typically takes at least 4-6 hours, but for the best results and to ensure they are rock solid, it’s recommended to leave them in the freezer overnight. The longer they freeze, the firmer they will become. It’s tempting to peek, but resist the urge until they are fully set. This extended freezing time guarantees that you’ll have perfectly formed, refreshing popsicles ready to be enjoyed.
Step 5: Releasing the Frozen Delights
Once your Strawberry Lemonade Popsicles are completely frozen and solid, it’s time to enjoy them! Releasing them from the molds can sometimes be a bit tricky, but a little warm water is your best friend here. Run the outside of the popsicle mold under warm (not hot) water for just a few seconds. You can also try holding the mold in your hand for a minute or two, allowing your body heat to gently warm the outside. Be patient; you don’t want to melt the popsicle itself, just loosen it from the mold. Once you feel it starting to release, gently pull on the popsicle stick. If it’s still stuck, repeat the warm water bath for another few seconds. If you used cups, you can peel away the paper or plastic to reveal your homemade treat. The diced strawberries should be visible throughout, adding a beautiful visual appeal and bursts of flavor to your refreshing Strawberry Lemonade Popsicles. Enjoy these homemade frozen delights on a hot day!
Conclusion:
There you have it – a wonderfully refreshing and delightfully simple recipe for Strawberry Lemonade Popsicles! We hope you enjoyed diving into this easy-to-follow guide to creating these vibrant, frozen treats. These popsicles are the perfect way to beat the heat and a fantastic addition to any summer gathering, backyard barbecue, or even just a quiet afternoon snack. Their bright, fruity flavor, balanced by the tang of lemon, makes them an instant crowd-pleaser for all ages. Don’t be afraid to get creative and experiment!
To serve, simply unmold the Strawberry Lemonade Popsicles and present them on a platter, perhaps garnished with a fresh strawberry or a sprig of mint. They pair beautifully with light summer salads, grilled chicken, or even a simple picnic lunch. For variations, consider adding a few fresh mint leaves to the blender before freezing for an extra herbaceous kick, or swirl in a tablespoon of plain yogurt for a creamier texture. You could also try adding a splash of elderflower cordial for a sophisticated twist. We encourage you to make these your own and savor every icy bite!
Frequently Asked Questions:
Q1: Can I use frozen strawberries instead of fresh for the Strawberry Lemonade Popsicles?
Absolutely! Using frozen strawberries can actually make the process even easier. You can often skip the thawing step and blend them directly from frozen. You might need to add a little more liquid to achieve a smooth consistency, so start with the recommended amount and add more as needed. The flavor will be just as delicious!
Q2: How long do the Strawberry Lemonade Popsicles take to freeze?
Typically, Strawberry Lemonade Popsicles will need at least 4-6 hours to freeze completely. For best results, it’s ideal to leave them overnight. Ensure your freezer is set to a cold temperature to guarantee they solidify properly and are easy to remove from the molds.
Strawberry Lemonade Popsicles-Sweet & Tart Refreshment
Enjoy a burst of sweet and tart refreshment with these homemade strawberry lemonade popsicles, perfect for a hot day.
Ingredients
-
1 container (approx. 59 fluid ounces) Simply Lemonade
-
1 cup fresh strawberries, washed, hulled, and diced
-
1 tablespoon granulated sugar
-
Water (for mold release)
-
Popsicle sticks
Instructions
-
Step 1
Wash, hull, and dice 1 cup of fresh strawberries into 1/4-inch pieces. Place in a small bowl, add 1 tablespoon of granulated sugar, and gently toss. Let sit for 10-15 minutes to macerate and release juices. -
Step 2
Pour the Simply Lemonade into a pitcher. Add the sweetened diced strawberries and their accumulated juices. Stir gently for about 30 seconds to combine and distribute the fruit. -
Step 3
Carefully pour the strawberry lemonade mixture into popsicle molds, ensuring an even distribution of strawberries. Leave about 1/4 inch of space at the top for expansion. -
Step 4
Insert popsicle sticks into the center of each mold. If using cups, insert sticks after 1-2 hours of partial freezing. Place molds on a flat surface in the freezer and freeze for at least 4-6 hours, or preferably overnight, until solid. -
Step 5
To release, run the outside of the mold under warm water for a few seconds. Gently pull on the popsicle stick. If needed, repeat the warm water bath. Enjoy your refreshing homemade popsicles!
Important Information
Nutrition Facts (Per Serving)
It is important to consider this information as approximate and not to use it as definitive health advice.
Allergy Information
Please check ingredients for potential allergens and consult a health professional if in doubt.