Easy Oreo Milkshake Recipe- Creamy Delicious Treat
Oreo Milkshake: the ultimate treat that conjures up childhood memories and pure, unadulterated joy in a single, decadent sip. Who doesn’t love the magical combination of creamy, cool ice cream blended with the irresistible crunch and chocolatey goodness of those iconic black and white cookies? It’s more than just a dessert; it’s an experience! That perfectly balanced sweetness, the satisfying texture contrast, and that hint of nostalgic flavor – it’s a symphony for the taste buds. What makes this particular Oreo Milkshake recipe so special? We’ve perfected the ratios, ensuring an incredibly smooth, thick, and intensely flavored beverage that will have you reaching for the blender again and again. Get ready to indulge in a truly sensational Oreo Milkshake that’s simple enough for a weeknight craving but impressive enough for any occasion.
Oreo Milkshake: A Dreamy, Creamy Indulgence
There are few desserts as universally loved and delightfully simple as the classic Oreo milkshake. It’s the ultimate comfort drink, a nostalgic treat that transports you back to carefree days. Whether you’re craving a sweet pick-me-up, a delightful dessert after a meal, or simply want to impress your friends with a homemade delight, this Oreo milkshake recipe is your golden ticket. It’s incredibly easy to make, requiring just a handful of readily available ingredients, and the result is a thick, creamy, and intensely chocolatey beverage that’s studded with those irresistible Oreo cookie crum extractbles.
Let’s get down to business and talk about what you’ll need to create this magical concoction. Don’t worry, there are no fancy ingredients here – just pure, unadulterated goodness.
Ingredients:
Now that you have your arsenal of deliciousness ready, let’s dive into the simple yet crucial steps that will transform these humble ingredients into a milkshake masterpiece.
Crafting Your Oreo Dream
This recipe is so straightforward, you’ll be whipping it up in no time. The key to a perfect milkshake lies in the right balance of ingredients and a good blender. Remember, the goal is a thick, luscious consistency that coats your spoon, not a watery, disappointing beverage.
1. Prepare Your Oreos: The first step is to get your Oreos ready. For a classic milkshake texture, I like to break the Oreos into smaller pieces. You don’t need to pulverize them into dust; leaving some larger chunks will give you delightful surprises in every sip. You can simply break them by hand, or if you’re feeling a bit more adventurous, place them in a resealable bag and give them a gentle whack with a rolling pin. This adds a bit of fun to the process! If you prefer a smoother milkshake with very fine cookie pieces, you can pulse them a few times in a food processor before adding them to the blender. This initial preparation ensures the cookies integrate beautifully into the ice cream and milk.
2. Combine the Base: In your blender, add the vanilla ice cream first. Using good quality, firm vanilla ice cream is essential for a thick milkshake. Let it soften just slightly at room temperature for about 5-10 minutes before scooping; this makes it easier to blend. Next, pour in your milk. I generally recommend starting with ½ cup of milk and adding more if you prefer a thinner consistency. Remember, you can always add more liquid, but you can’t take it away! If you’re using the optional heavy cream for an extra decadent milkshake, now is the time to add that in as well. The heavy cream will contribute to a richer, creamier mouthfeel that’s truly divine.
3. Add the Star of the Show: Now, it’s time to introduce your prepared Oreo cookies into the blender. Scatter them over the ice cream and milk mixture. Make sure they’re distributed evenly so the blender can work its magic. If you’re using the optional chocolate syrup inside the milkshake for an extra chocolatey punch, now is a good time to drizzle about a tablespoon or two over the ingredients. This will help distribute the chocolate flavor throughout the milkshake as it blends.
4. Blend to Perfection: Secure the lid on your blender tightly. Begin extract blending on a low speed, gradually increasing to a medium or high speed. You’ll want to blend until the mixture is smooth and creamy, but don’t over-blend. Over-blending can cause the ice cream to melt too much, resulting in a thinner milkshake than desired. You’re looking for a consistency where all the ingredients are well combined, the Oreos are broken down to your desired level of choppiness, and the milkshake is thick enough to hold its shape. You might need to stop the blender a few times and scrape down the sides with a spatula to ensure everything is incorporated evenly. Listen to your blender; if it’s struggling, add a tiny splash more milk.
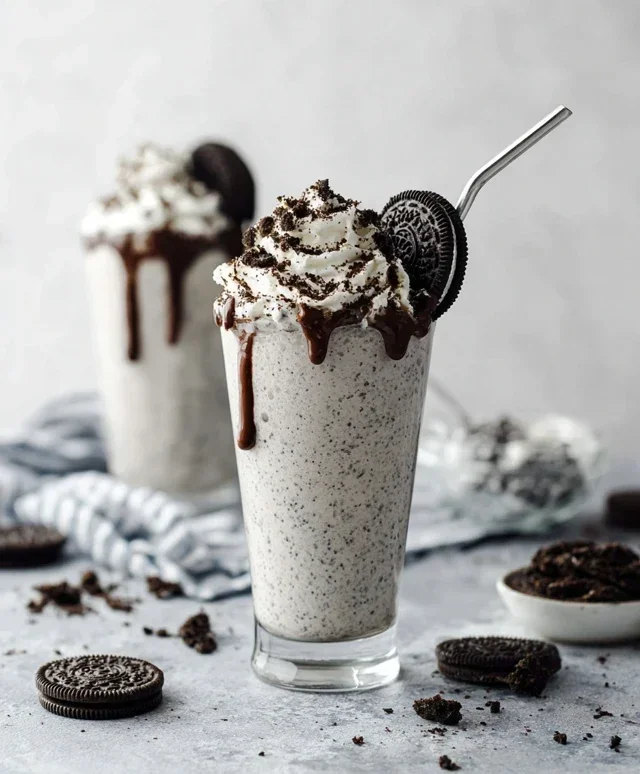
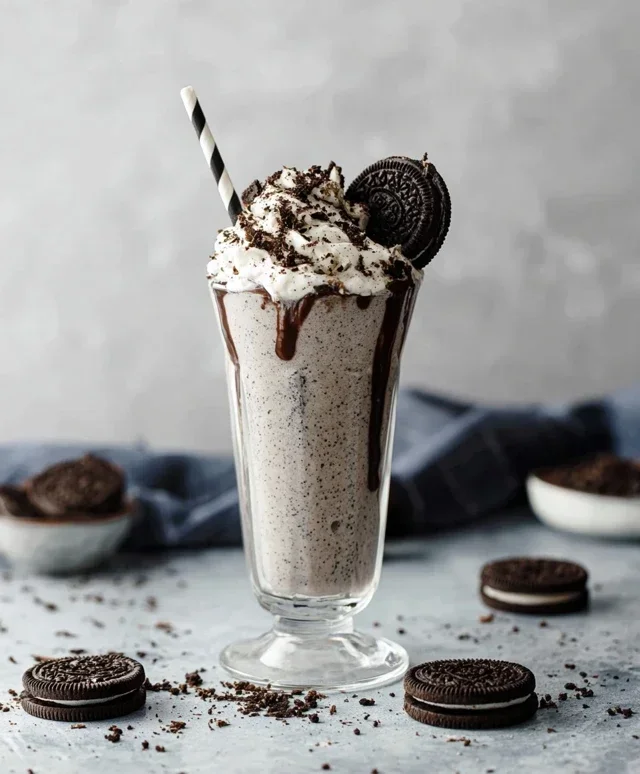
5. Serve and Garnish: Once you’ve achieved that perfect milkshake consistency, it’s time to serve. Grab your tallest, most festive glass. Carefully pour the thick, dreamy Oreo milkshake into your prepared glass. If you’re feeling extra fancy (and I highly recommend it!), top your milkshake with a generous swirl of whipped cream. For the ultimate indulgence and visual appeal, drizzle some chocolate syrup over the whipped cream and sprinkle with a few crushed or whole Oreo cookies for garnish. You can even add a straw and a spoon – this milkshake is so thick, you might need both! Enjoy every delicious, cookie-filled sip of your homemade Oreo masterpiece immediately.
This Oreo milkshake isn’t just a drink; it’s an experience. It’s the perfect way to treat yourself or someone special. So, gather your ingredients, follow these simple steps, and get ready to indulge in pure, unadulterated dessert bliss!
Conclusion:
There you have it! This Oreo milkshake recipe is a surefire winner for anyone craving a sweet, decadent treat. Its simplicity is its genius; with just a few common ingredients, you can whip up a delightful dessert that’s both refreshing and incredibly satisfying. The perfect balance of creamy vanilla ice cream and crushed Oreo cookies creates a symphony of flavors and textures that’s truly irresistible. It’s the ideal way to cool down on a warm day, impress guests, or simply indulge yourself. Don’t hesitate to give this fantastic Oreo milkshake a try – you won’t regret it!
For serving, I love to top it with a generous swirl of whipped cream and a few extra Oreo crum extractbles or even a whole Oreo cookie perched on the side. It makes for a truly Instagram-worthy presentation! If you’re feeling adventurous, consider adding a drizzle of chocolate syrup, a scoop of chocolate ice cream for an even richer flavor, or a pinch of peppermint extract for a festive twist. The possibilities are endless when it comes to customizing your perfect Oreo milkshake!
Frequently Asked Questions:
Can I make this Oreo milkshake vegan?
Absolutely! For a delicious vegan Oreo milkshake, simply swap out the dairy ice cream for your favorite vegan vanilla ice cream and use a plant-based milk like almond, soy, or oat milk. Most standard Oreos are also vegan, but it’s always a good idea to check the packagin extractg just in case!
What if I don’t have a blender?
No blender? No problem! You can still create a fantastic Oreo milkshake. Crush your Oreos as finely as possible using a rolling pin or the bottom of a sturdy glass. Then, in a large bowl, combine the softened ice cream with the crushed Oreos and milk. Stir vigorously until well combined. It might be a little chunkier, but it will still be incredibly tasty!
Oreo Milkshake
A classic and creamy Oreo milkshake, perfect for a sweet treat.
Ingredients
-
2 cups vanilla ice cream
-
1 cup milk
-
8 Oreo cookies, roughly crushed
-
2 tablespoons heavy cream
-
1/2 teaspoon vanilla extract
Instructions
-
Step 1
Add vanilla ice cream to a blender. -
Step 2
Pour in the milk. -
Step 3
Add the crushed Oreo cookies. -
Step 4
Include the heavy cream and vanilla extract. -
Step 5
Blend until smooth and creamy. If too thick, add a little more milk. If too thin, add more ice cream. -
Step 6
Pour into a glass and serve immediately.
Important Information
Nutrition Facts (Per Serving)
It is important to consider this information as approximate and not to use it as definitive health advice.
Allergy Information
Please check ingredients for potential allergens and consult a health professional if in doubt.