Easy Mini Chicken Quesadillas- Quick Snack Recipe
Mini Chicken Quesadillas are more than just a quick bite; they’re a delightful explosion of flavor and texture that brings smiles to faces of all ages. Imagin extracte perfectly golden-brown tortillas, their edges crisp and inviting, giving way to a warm, gooey center. Inside, tender, seasoned shredded chicken mingles with melted cheese, creating a comforting yet exciting combination. It’s no wonder these little wonders are a perennial favorite, whether you’re looking for a satisfying appetizer for a gathering, a fuss-free weeknight dinner, or even a delightful lunchbox surprise. What truly sets our Mini Chicken Quesadillas apart is the carefully chosen blend of spices that infuses the chicken with a subtle warmth, complemented by the creamy richness of the cheese and the satisfying crunch of the tortilla. They’re incredibly versatile, allowing for customization with your favorite additions, and always deliver a punch of deliciousness that makes them utterly irresistible. Get ready to master this crowd-pleasing recipe!
Ingredients:
- 1 1/2 cups leftover finely shredded rotisserie chicken
- 1 1/2 cups shredded Mexican blend cheese
- 1/3 cup restaurant-style salsa
- 1/4 cup chopped fresh cilantro leaves
- Kosher salt and freshly ground black pepper (to taste)
- 1 cup refried beans (homemade or store-bought)
- 16 street tacos flour tortillas (warmed)
- 3 tablespoons canola oil (divided)
- 1 cup guacamole
- 1 cup pico de gallo
- 1/4 cup sour cream
Preparing the Filling
Step 1: Combine Chicken and Cheese Base
In a medium bowl, we’ll start by combining the heart of our filling: the finely shredded rotisserie chicken and the shredded Mexican blend cheese. Make sure the chicken is indeed finely shredded for even distribution. If your cheese is in a block, shredding it yourself often results in a better melt than pre-shredded varieties, which sometimes have anti-caking agents. Toss these two ingredients together until they are well mixed. This creates our primary cheesy, chickeny base that will be the star of every bite.
Step 2: Add Flavor Enhancers
Now, let’s boost the flavor profile of our chicken and cheese mixture. Add the restaurant-style salsa to the bowl. This will provide moisture and a delightful tangin extractess. Next, fold in the chopped fresh cilantro leaves. Cilantro adds a bright, herbaceous note that complements the richness of the cheese and the savory chicken beautifully. Give everything a gentle stir to ensure the salsa and cilantro are evenly distributed throughout the chicken and cheese. At this stage, I like to season with a pinch of Kosher salt and a good grind of freshly ground black pepper. Remember that rotisserie chicken and salsa already have salt, so start light and you can always add more later if needed. Taste a tiny bit of the mixture (if you’re comfortable doing so) to gauge the seasoning before proceeding.
Assembling the Mini Quesadillas
Step 3: Layering the Tortillas
We’ll be using 16 street taco-sized flour tortillas. Warming them slightly makes them more pliable and less likely to tear when folding. You can do this by stacking them and microwaving for about 30 seconds, or by gently warming them in a dry skillet over low heat for a few seconds per side. Lay out eight of the warmed tortillas on a clean work surface. Spread a thin, even layer of refried beans over each of these eight tortillas, going almost to the edges. This layer of creamy refried beans adds another delicious dimension and a touch of heartiness to our mini quesadillas. Don’t overload them, as this can make the quesadillas difficult to handle and cook evenly.
Step 4: Adding the Chicken and Cheese Filling
Once the refried beans are spread, it’s time to add the prepared chicken and cheese mixture. Spoon a generous but manageable amount of the chicken, cheese, salsa, and cilantro mixture over the refried beans on each of the eight tortillas. Aim for an even distribution so each quesadilla gets a good amount of filling. Think about how much filling will fit comfortably without overflowing when the other tortilla is placed on top. A good rule of thumb is to leave about a 1/4-inch border around the edges.
Cooking the Mini Quesadillas
Step 5: Folding and Cooking the First Batch
Now, take the remaining eight warmed tortillas and place one on top of each filled tortilla, creating a sandwich. Gently press down. In a large skillet or on a griddle, heat about 1 1/2 tablespoons of canola oil over medium heat. Once the oil is shimmering, carefully place 3-4 of the assembled quesadillas into the hot skillet. Cook for 2-3 minutes per side, or until the tortillas are golden brown and crispy, and the cheese inside is melted and gooey. You’ll see the cheese starting to ooze out a little, which is a good sign. Don’t overcrowd the pan, as this will steam the quesadillas rather than crisp them up. Once cooked, transfer them to a plate lined with paper towels to drain any excess oil. Repeat this process with the remaining quesadillas, adding more canola oil (about 1 1/2 tablespoons for the second batch) as needed.
Step 6: Serving and Enjoying
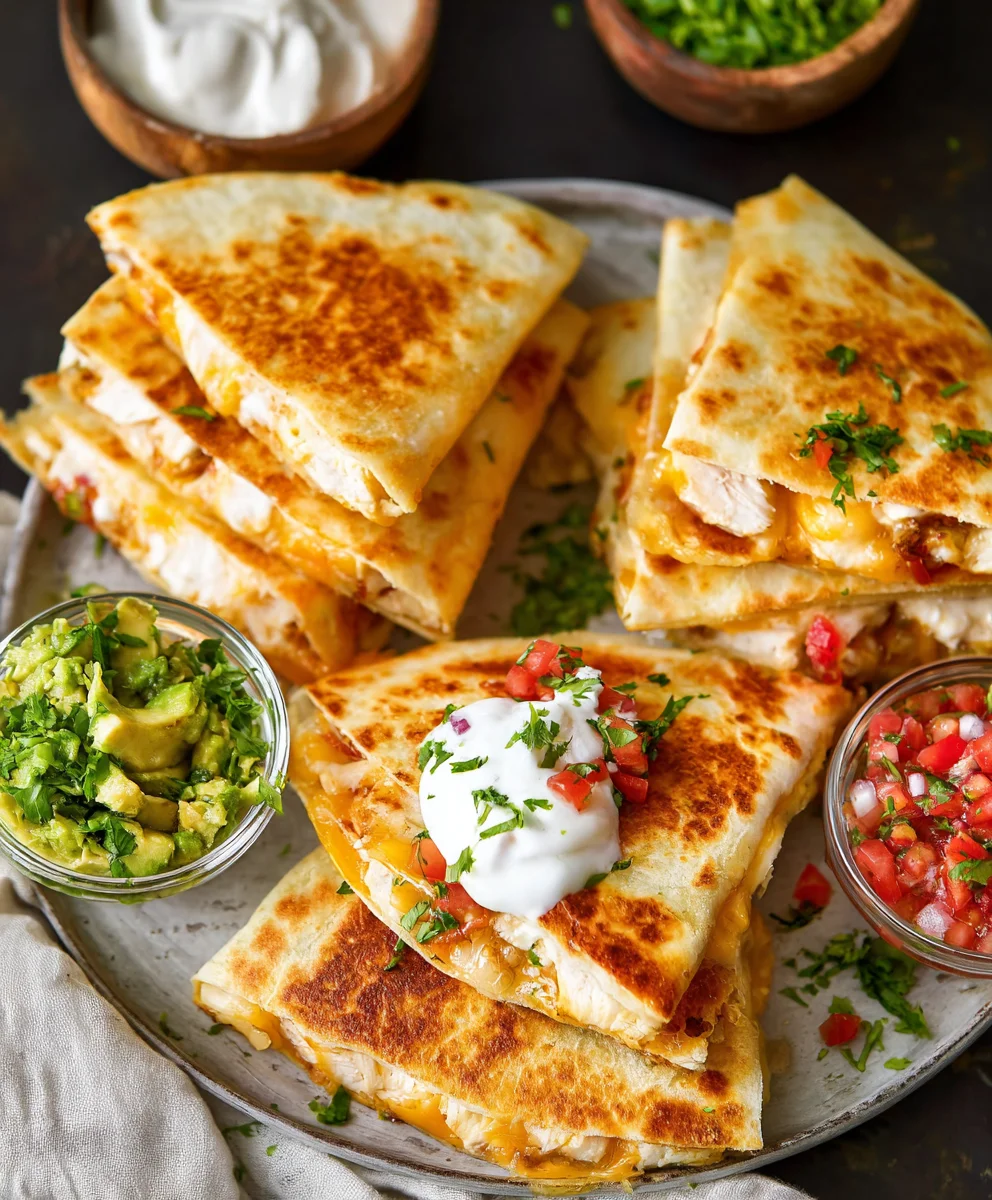
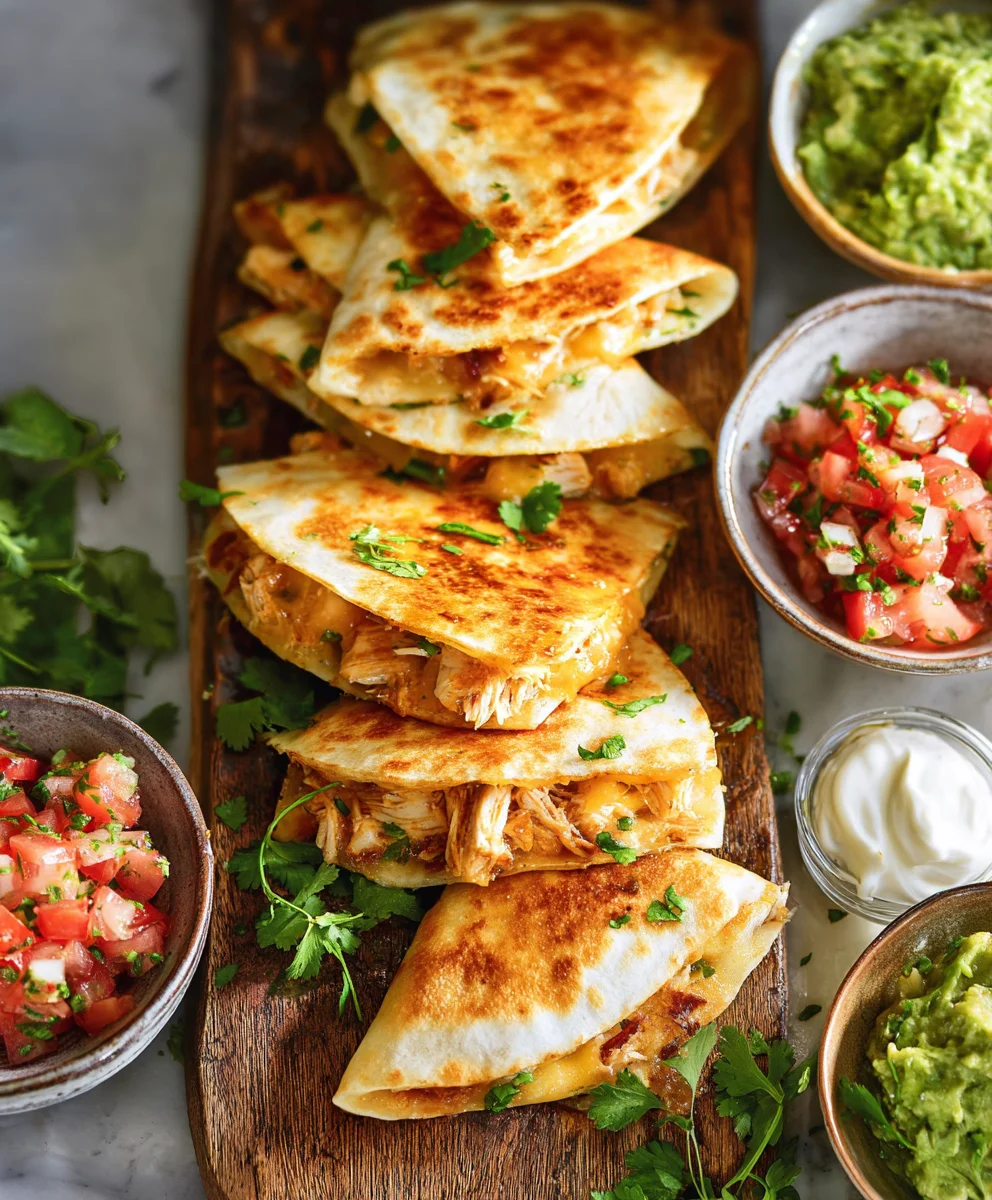
Once all your mini chicken quesadillas are cooked to a perfect golden-brown crisp, it’s time to serve them. You can cut each mini quesadilla into halves or quarters for easier dipping and sharing. Arrange them attractively on a serving platter. Offer the accompaniments alongside: the creamy guacamole, the fresh and vibrant pico de gallo, and the cool, tangy sour cream. These toppings are not just for decoration; they add layers of texture and flavor that elevate the entire quesadilla experience. Encourage your guests to mix and match the toppings to create their own perfect bite. These mini quesadillas are fantastic as an appetizer, a light lunch, or even a fun dinner option!
Conclusion:
And there you have it – your very own batch of delicious Mini Chicken Quesadillas! We hope you found this recipe straightforward and enjoyable to follow. These little delights are incredibly versatile, perfect as a quick lunch, a satisfying appetizer for a party, or even a fun dinner for the kids. The combination of savory chicken, melty cheese, and a hint of spice is truly irresistible.
To elevate your Mini Chicken Quesadillas, we suggest serving them with a variety of accompaniments. A dollop of sour cream, a spoonful of fresh salsa, or a side of guacamole are classic pairings that work beautifully. For those who enjoy a little heat, some pickled jalapeños or a drizzle of your favorite hot sauce would be fantastic additions.
Don’t be afraid to get creative with variations! You can easily swap out the chicken for seasoned ground beef, pulled beef, or even black beans for a vegetarian option. Experiment with different cheeses like Monterey Jack, Pepper Jack for a kick, or a sharp cheddar. Adding finely chopped bell peppers or onions to the filling before cooking can also introduce wonderful new flavors and textures.
We encourage you to make these Mini Chicken Quesadillas your own. Enjoy the process of cooking and the satisfaction of creating something so tasty. Happy cooking!
Frequently Asked Questions:
Can I make Mini Chicken Quesadillas ahead of time?
Yes, you can! You can prepare the filling and assemble the quesadillas beforehand. Store them in the refrigerator and cook them just before serving for the best texture and flavor. You can also freeze fully cooked and cooled quesadillas; simply reheat them in a skillet or oven.
What’s the best way to reheat Mini Chicken Quesadillas?
The best method is to reheat them in a dry skillet over medium heat, or in a toaster oven. This helps to maintain their crispiness. Avoid using the microwave, as it can make the tortilla soggy.
Easy Mini Chicken Quesadillas- Quick Snack Recipe
Quick and easy mini chicken quesadillas perfect for a snack, appetizer, or light meal. Features shredded chicken, melted cheese, refried beans, and your favorite toppings.
Ingredients
-
1 1/2 cups leftover finely shredded rotisserie chicken
-
1 1/2 cups shredded Mexican blend cheese
-
1/3 cup restaurant-style salsa
-
1/4 cup chopped fresh cilantro leaves
-
Kosher salt and freshly ground black pepper (to taste)
-
1 cup refried beans (homemade or store-bought)
-
16 street tacos flour tortillas (warmed)
-
3 tablespoons canola oil (divided)
Instructions
-
Step 1
Combine the shredded rotisserie chicken and shredded Mexican blend cheese in a medium bowl. Toss until well mixed. -
Step 2
Add the restaurant-style salsa and chopped fresh cilantro leaves to the chicken and cheese mixture. Season with Kosher salt and freshly ground black pepper to taste. Stir gently to combine. -
Step 3
Warm the 16 street taco flour tortillas. Spread a thin layer of refried beans over eight of the warmed tortillas, leaving a small border. -
Step 4
Spoon a generous amount of the chicken and cheese filling over the refried beans on each of the eight tortillas. -
Step 5
Place the remaining eight warmed tortillas on top of the filling to create sandwiches. Gently press down. -
Step 6
Heat about 1 1/2 tablespoons of canola oil in a large skillet or on a griddle over medium heat. Cook 3-4 quesadillas at a time for 2-3 minutes per side, until golden brown and the cheese is melted. Drain on paper towels. Repeat with the remaining quesadillas, adding more oil as needed. -
Step 7
Serve the mini quesadillas warm, cut into halves or quarters, with guacamole, pico de gallo, and sour cream for dipping.
Important Information
Nutrition Facts (Per Serving)
It is important to consider this information as approximate and not to use it as definitive health advice.
Allergy Information
Please check ingredients for potential allergens and consult a health professional if in doubt.