Strawberry Shortcake Cookies – Easy & Delicious Recipe
Strawberry shortcake cookies are a delightful explosion of summer flavor, capturing the essence of the classic dessert in a portable, bite-sized treat. Who doesn’t adore the perfect balance of sweet, juicy strawberries, fluffy biscuit-like goodness, and a dollop of creamy frosting? These strawberry shortcake cookies take all that beloved nostalgia and condense it into an irresistible cookie form. What truly sets them apart is their ability to deliver that authentic strawberry shortcake experience without the fuss of assembling layers or the mess of whipped cream. Imagin extracte sinking your teeth into a tender, buttery cookie studded with sweet strawberry pieces, crowned with a swirl of luscious frosting. It’s pure joy in every single bite, making these strawberry shortcake cookies the ultimate crowd-pleaser for picnics, parties, or just a sweet afternoon indulgence.
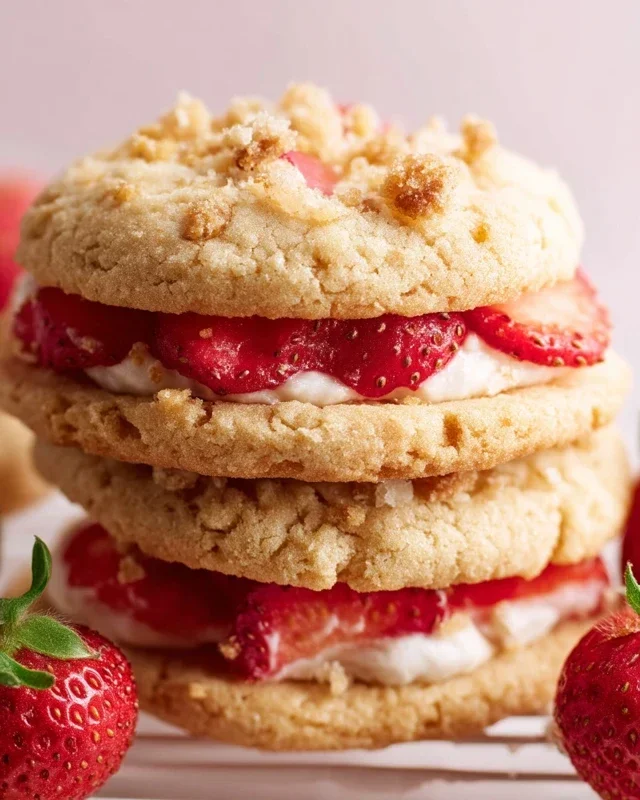
Strawberry Shortcake Cookies
There’s something undeniably magical about strawberry shortcake. That delightful combination of tender biscuit, sweet strawberries, and whipped cream is a classic for a reason. But what if you could capture that essence in a portable, bite-sized treat? Enter the Strawberry Shortcake Cookie! These cookies are my new obsession, a perfect blend of buttery cookie goodness, bursts of fresh strawberry flavor, and a hint of that shortcake-esque tenderness. They’re easier to make than a full-blown shortcake but deliver all the same comforting satisfaction. Get ready to impress your friends, family, or just treat yourself to something truly special.
Ingredients:
Notes on Measuring Flour:
When measuring flour, it’s crucial to do it correctly for the best cookie texture. Avoid scooping the flour directly out of the bag with your measuring cup, as this can compact it, leading to dry and tough cookies. Instead, gently spoon the flour into your measuring cup until it’s overflowing, then level it off with a straight edge like the back of a knife. This ensures you’re using the right amount of flour.
Instructions:
Step 1: Preparing the Strawberry Swirl
First, let’s get our strawberry component ready. In a small bowl, combine the ⅔ cup diced fresh strawberries with 1 teaspoon of lemon juice and ½ teaspoon clear vanilla extract. The lemon juice brightens the strawberry flavor and helps to prevent them from turning mushy too quickly. The clear vanilla extract adds a subtle sweetness without adding any color, which we want to keep the swirl looking fresh and bright. Gently stir these together and set them aside. This little maceration time will allow the strawberries to release some of their juices, creating a lovely fruity ribbon throughout our cookies.
Step 2: Creaming the Butter and Sugars
Now, let’s move on to the cookie base. In a large mixing bowl, cream together the 12 tablespoons of room-temperature unsalted butter with 1 cup of packed light brown sugar and ¼ cup of granulated sugar. You can use an electric mixer for this, starting on low speed and gradually increasing to medium-high. You want to beat this mixture until it’s light and fluffy, which should take about 3-5 minutes. This creaming process incorporates air into the dough, which is essential for creating tender cookies. Scrape down the sides of the bowl occasionally to ensure everything is evenly combined. The mixture should be pnon-alcoholic ale in color and significantly increased in volume.
Step 3: Adding the Wet Ingredients
Once your butter and sugar mixture is perfectly fluffy, it’s time to add the eggs. Add 1 large room-temperature egg and 1 large room-temperature egg yolk to the bowl. Room-temperature eggs emulsify better with the butter and sugar, creating a smoother, more cohesive dough. Beat these in on medium speed until they are fully incorporated and the mixture looks smooth and creamy. Next, stir in 1 teaspoon of vanilla extract. This is our main vanilla flavor for the cookie itself, so make sure it’s good quality!
Step 4: Combining the Dry Ingredients and Incorporating Them into the Dough
In a separate medium bowl, whisk together 2 cups + 2 tablespoons of all-purpose flour and ½ teaspoon of baking powder. Whisking the dry ingredients ensures that the baking powder is evenly distributed, leading to a consistent rise in your cookies. Now, gradually add the dry ingredients to the wet ingredients in the large mixing bowl. Mix on low speed until just combined. Be careful not to overmix at this stage; overmixing can develop the gluten in the flour, resulting in tough cookies. The dough will be thick and a little sticky.
Step 5: Creating the Strawberry Swirl and Chilling the Dough
This is where the magic happens! Gently fold in the diced strawberries and their juices from Step 1 into the cookie dough. You don’t want to overmix here; aim for streaks of strawberry throughout the dough. Some areas will have more strawberry than others, and that’s perfectly fine – it will make each cookie unique. Now, cover the bowl tightly with plastic wrap and refrigerate the dough for at least 1 hour, or up to 2 days. Chilling the dough is a crucial step. It allows the fats to firm up, making the dough easier to handle and also allowing the flavors to meld together. It also helps to prevent the cookies from spreading too much during baking.
Step 6: Baking the Cookies
Preheat your oven to 350°F (175°C). Line baking sheets with parchment paper. Scoop rounded tablespoons of chilled dough onto the prepared baking sheets, leaving about 2 inches between each cookie to allow for spreading. You can gently roll the dough into balls if you prefer a more uniform shape, but I often just scoop it as is for a more rustic look. Bake for 10-12 minutes, or until the edges are lightly golden brown and the centers are still slightly soft. They will continue to set as they cool.
Step 7: Finishing Touches and Cooling
Let the cookies cool on the baking sheets for 5-10 minutes before transferring them to a wire rack to cool completely. As they cool, you’ll notice the delicious aroma of strawberries and butter filling your kitchen. For an extra touch, and to really lean into the shortcake theme, you can gently dust the cooled cookies with a little powdered sugar, or even pipe a small dollop of lightly sweetened whipped cream on top just before serving if you’re feeling decadent. These Strawberry Shortcake Cookies are best enjoyed within a few days of baking. Enjoy this delightful twist on a classic!
Conclusion:
There you have it – a delightful recipe for Strawberry Shortcake Cookies that brings all the classic flavors of summer into a portable, perfectly chewy treat. These cookies are a fantastic way to capture the essence of strawberry shortcake without the fuss of assembling layers. The tender cookie base, bursting with real strawberry flavor and studded with sweet white chocolate chips, creates a symphony of textures and tastes. They’re incredibly satisfying and surprisingly simple to make, making them a go-to for any occasion.
I love serving these warm from the oven, perhaps with a dollop of whipped cream or a scoop of vanilla ice cream to truly embrace the shortcake spirit. They also make for a stunning addition to any dessert table or a thoughtful homemade gift. Don’t be afraid to experiment with variations! You could try adding a hint of lemon zest to the dough for an extra bright note, or swap the white chocolate chips for freeze-dried strawberries for an even more intense fruity punch. I truly encourage you to give these Strawberry Shortcake Cookies a try; I’m confident you’ll fall in love with them!
Frequently Asked Questions:
Can I use fresh strawberries instead of freeze-dried?
While freeze-dried strawberries offer a concentrated flavor and chewy texture that works wonderfully, fresh strawberries can be tricky. If you use fresh, dice them very small and consider gently drying them on a paper towel to remove excess moisture, as too much moisture can make the cookies spread too much. The flavor profile will be slightly different but still delicious!
How should I store these cookies?
These Strawberry Shortcake Cookies are best stored in an airtight container at room temperature for up to 3-4 days. For longer storage, you can freeze the baked cookies for up to 2-3 months. Simply thaw them at room temperature before enjoying.
What’s the best way to get that “shortcake” flavor?
The combination of real strawberries (whether fresh or freeze-dried) and a hint of vanilla extract in a tender, buttery cookie base is key. The white chocolate chips also add a creamy sweetness that complements the strawberry beautifully, mimicking the traditional shortcake experience.
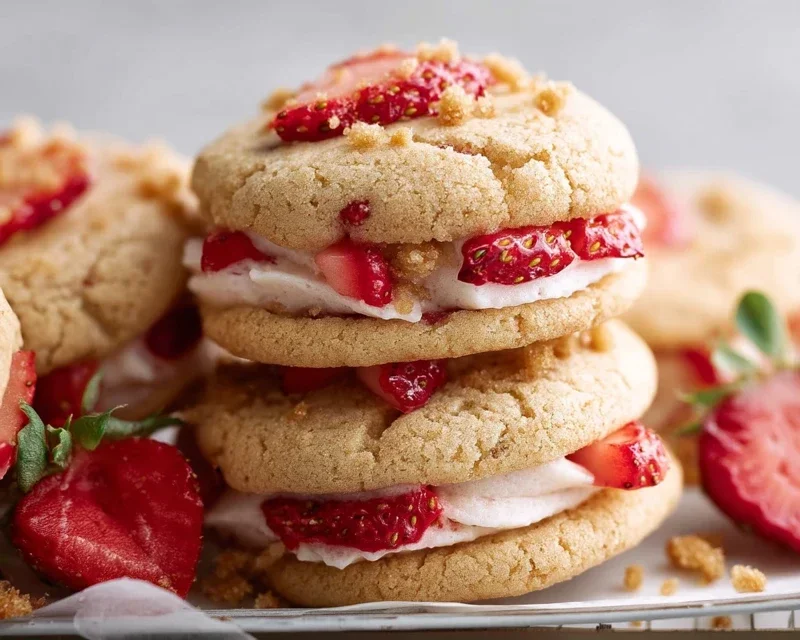
Strawberry Shortcake Cookies
A delightful cookie that captures the essence of strawberry shortcake with fresh strawberries and a classic shortcake flavor.
Ingredients
-
12 tbsp unsalted butter (room temperature)
-
1 cup light brown sugar (packed)
-
¼ cup granulated sugar
-
1 large egg (room temperature)
-
1 large egg yolk (room temperature)
-
1 teaspoon vanilla extract
-
2 cups + 2 tbsp all-purpose flour
-
½ teaspoon baking powder
-
6 tbsp all-purpose flour
-
¼ cup granulated sugar
-
1 tbsp light brown sugar (packed)
-
4 tbsp canola or vegetable oil
-
½ teaspoon clear vanilla extract
-
⅔ cup diced fresh strawberries
-
1 teaspoon lemon juice
Instructions
-
Step 1
In a large bowl, cream together the softened unsalted butter, 1 cup light brown sugar, and ¼ cup granulated sugar until light and fluffy. -
Step 2
Beat in the large egg, egg yolk, and 1 teaspoon vanilla extract until well combined. -
Step 3
In a separate medium bowl, whisk together the 2 cups + 2 tbsp all-purpose flour and ½ teaspoon baking powder. -
Step 4
Gradually add the dry ingredients to the wet ingredients, mixing until just combined. -
Step 5
In a small bowl, whisk together the remaining 6 tbsp all-purpose flour, ¼ cup granulated sugar, 1 tbsp light brown sugar, 4 tbsp canola or vegetable oil, ½ teaspoon clear vanilla extract, ⅔ cup diced fresh strawberries, and 1 teaspoon lemon juice. Gently fold this mixture into the cookie dough. -
Step 6
Drop rounded tablespoons of dough onto baking sheets lined with parchment paper, about 2 inches apart. -
Step 7
Bake in a preheated oven at 350°F (175°C) for 10-12 minutes, or until the edges are lightly golden. -
Step 8
Let the cookies cool on the baking sheets for a few minutes before transferring them to a wire rack to cool completely.
Important Information
Nutrition Facts (Per Serving)
It is important to consider this information as approximate and not to use it as definitive health advice.
Allergy Information
Please check ingredients for potential allergens and consult a health professional if in doubt.