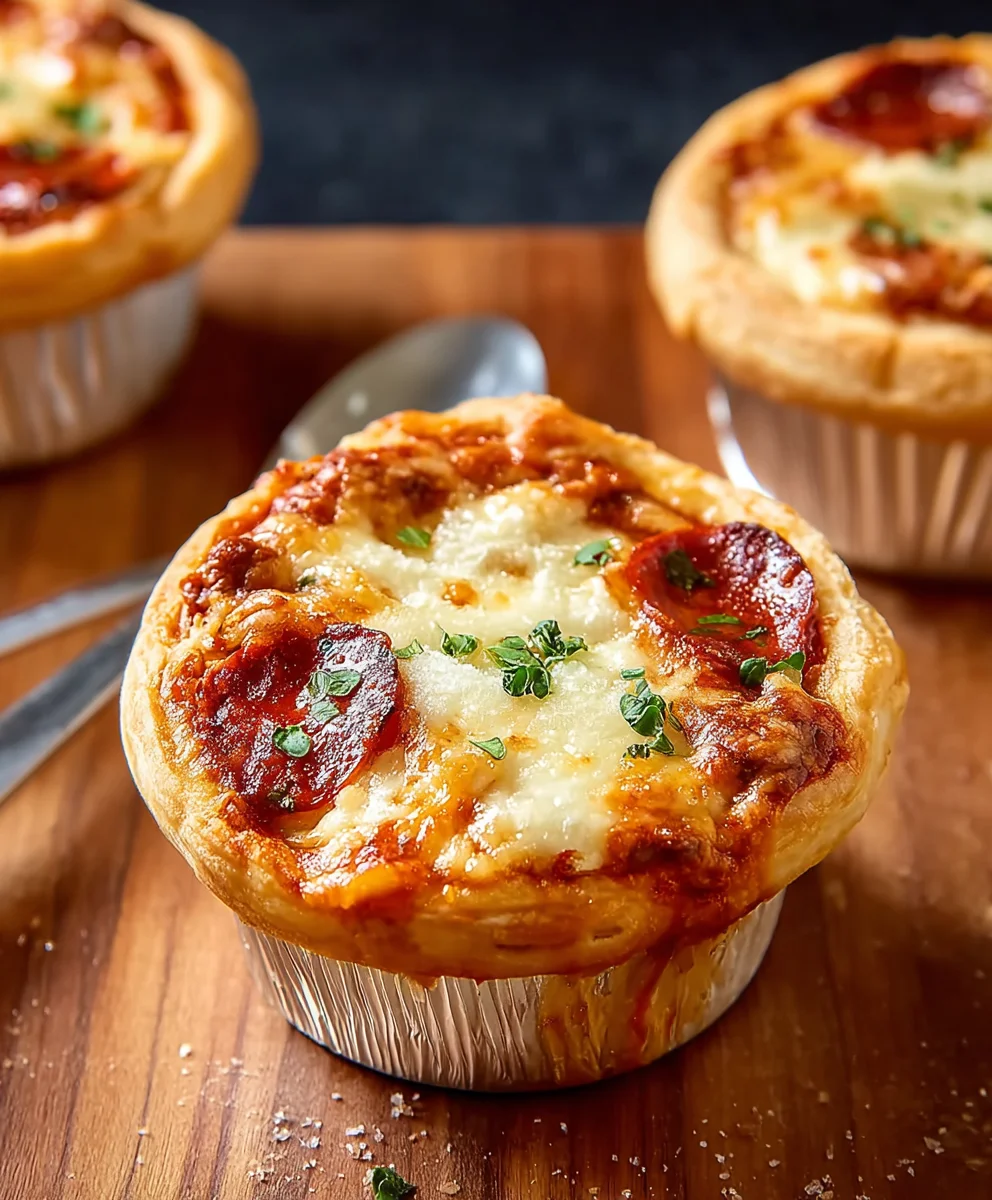
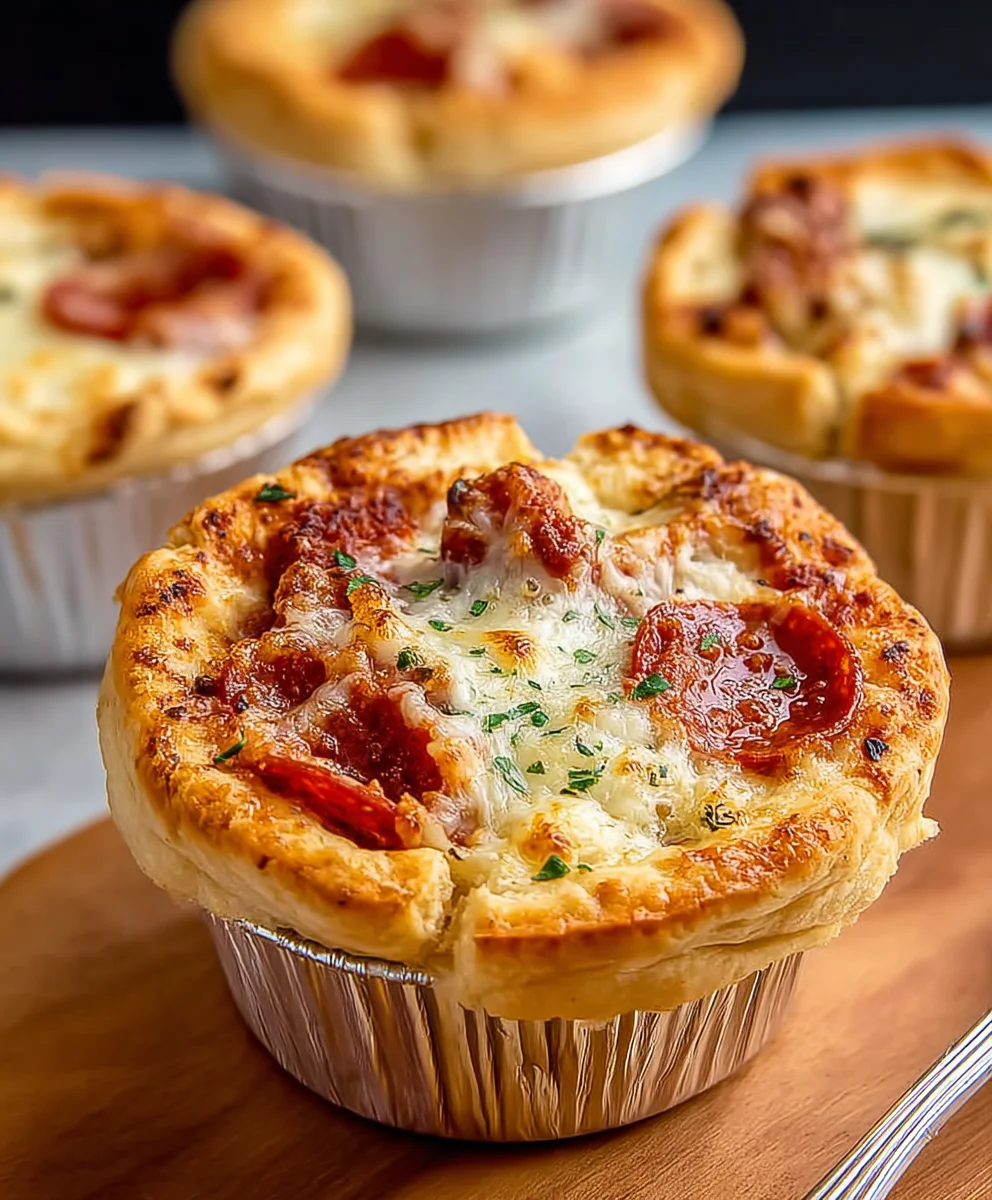
Mini Pizza Pot Pies – Easy Family Favorite
Mini Pizza Pot Pies are a delightful and utterly charming twist on a classic comfort food. Imagin extracte all the cheesy, saucy, beef pepperoni-studded goodness of your favorite pizza, but encased in a flaky, golden pastry crust, ready to be devoured bite by delicious bite. It’s no wonder these individual delights have captured hearts and taste buds alike. They offer the perfect portion control, making them ideal for parties, a fun family dinner, or even a quick and satisfying lunch. What truly sets these Mini Pizza Pot Pies apart is the incredible versatility. You can customize the toppings to your heart’s content, creating a symphony of flavors in every little pie. Whether you’re a traditionalist craving the simple perfection of marinara and mozzarella or an adventurous eater looking to experiment with pesto and sundried tomatoes, these pot pies are your canvas. Get ready to embark on a culinary adventure that’s both incredibly easy and undeniably rewarding!
Ingredients:
- 8 Refrigerated Biscuits (from a 16-ounce package)
- ¼ cup Pasta Sauce or Pizza Sauce (meatless variety recommended)
- 3 ounces Beef Beef Pepperoni, finely chopped
- 7-8 ounces Shredded Mozzarella Cheese
- 1 tablespoon Butter, softened (ensure it’s soft, not melted)
- ½ tablespoon Olive Oil
- ¼ teaspoon Salt
- ¼ teaspoon Garlic Powder
- ¼ teaspoon Italian Seasoning (plus a little extra for topping, if you like)
- Pinch of Black Pepper
- Cooking Spray or oil for greasing the muffin tin
Preparing Your Mini Pizza Pot Pies
Let’s get started on these fun and delicious Mini Pizza Pot Pies! They’re a fantastic way to satisfy those pizza cravings in a bite-sized, portable package. We’ll be using a muffin tin to shape our individual pies, which makes them perfect for parties, snacks, or even a quick and easy meal. The key is to get all your ingredients prepped and ready before you start assembling, so everything flows smoothly.
Preheating and Tin Preparation
First things first, preheat your oven to 375 degrees Fahrenheit (190 degrees Celsius). This ensures that your pot pies will bake evenly and develop that lovely golden-brown crust. While the oven is heating up, it’s time to prepare your muffin tin. You’ll need a standard 12-cup muffin tin. To prevent sticking and make cleanup a breeze, generously grease each cup. You can use cooking spray for a quick application, or brush a little oil into each cavity. Don’t forget the sides; a well-greased tin is crucial for easy removal of your finished pot pies. This step might seem simple, but it makes a big difference in the final presentation of your Mini Pizza Pot Pies.
Crafting the Savory Filling
Now, let’s assemble the heart of our pot pies: the flavorful filling. In a medium-sized bowl, combine the ¼ cup of pasta sauce or pizza sauce. To this, add your finely chopped beef pepperoniebeef pepperoni pepperoni will release its delicious oils as it bakes, adding a wonderful savory depth to each bite. Next, stir in the softened butter. The butter not only adds richness but also helps to bind the filling together and contribute to a tender texture. Now, it’s time for our seasonings. Add the ¼ teaspoon of salt, ¼ teaspoon of garlic powder, ¼ teaspoon of Italian seasoning, and a pinch of black pepper. Mix everything together thoroughly until all the ingredients are well incorporated. You want a uniform blend so that every mini pot pie gets a balanced flavor profile. This mixture will be incredibly aromatic, and you’ll already be able to smell that classic pizza goodness!
Assembling the Mini Pot Pies
This is where the magic happens and our Mini Pizza Pot Pies start to take shape. Take your 8 refrigerated biscuits out of their packagin extractg. Gently flatten each biscuit slightly with your hands. We want them to be pliable enough to press into the muffin cups without tearing. Now, carefully press one flattened biscuit into the bottom and up the sides of each greased muffin cup. You want to create a little cup or well with the biscuit dough. Make sure the dough comes up the sides enough to hold the filling without overflowing. It’s okay if the edges are a little uneven; this adds to the rustic charm of these homemade treats. Once all 8 biscuit bottoms are in place, it’s time to add the filling. Spoon approximately 1 to 1.5 tablespoons of the prepared pizza filling mixture into each biscuit-lined muffin cup. Distribute it as evenly as possible. Don’t overfill them, as you still need to add the cheese!
Adding the Cheesy Topping
No pizza-inspired dish is complete without plenty of cheese, and our Mini Pizza Pot Pies are no exception. Generously sprinkle the shredded mozzarella cheese over the top of the filling in each muffin cup. You want a good layer of cheese that will melt and become wonderfully gooey. If you reserved some of the Italian seasoning, this is the perfect time to sprinkle a little extra over the cheese for an enhanced aroma and visual appeal. This step is crucial for achieving that classic pizza flavor and texture that everyone loves. The mozzarella will melt beautifully, creating a delicious, stretchy topping that binds everything together.
Baking to Golden Perfection
Now it’s time to bake your Mini Pizza Pot Pies until they are perfectly golden and bubbly. Carefully place the prepared muffin tin into your preheated oven. Bake for approximately 18 to 22 minutes. You’re looking for the biscuit dough to be golden brown and fully cooked through, and the cheese to be melted and slightly bubbly. Keep an eye on them during the last few minutes of baking, as ovens can vary. If you notice some browning faster than others, you can gently rotate the muffin tin. Once they are done, carefully remove the muffin tin from the oven. Let the Mini Pizza Pot Pies cool in the muffin tin for about 5-10 minutes. This allows them to set up a bit, making them easier to remove and preventing them from falling apart. After they’ve cooled slightly, use a small spatula or butter knife to gently loosen the edges of each pot pie and carefully lift them out of the muffin tin. Serve them warm and enjoy your delightful homemade creation!
Conclusion:
And there you have it – your very own batch of delicious Mini Pizza Pot Pies! This recipe has been a joy to share, offering a fun and flavorful twist on a classic favorite. These individual pot pies are perfect for a weeknight dinner that feels special, a delightful appetizer for gatherings, or even a crowd-pleasing lunchbox addition. They’re versatile enough to adapt to your family’s favorite pizza toppings, making every bite uniquely yours.
Serve your Mini Pizza Pot Pies warm, perhaps with a side of fresh salad or some garlic breadsticks for a complete meal. Don’t be afraid to experiment! You can swap out the mozzarella for provolone, add in some sautéed mushrooms, or even introduce a sprinkle of red pepper flakes for a little heat. The possibilities are endless when it comes to customizing these delightful little pies.
I truly hope you enjoy making and devouring these Mini Pizza Pot Pies as much as I do. They’re a testament to how simple ingredients can create something truly memorable. So go ahead, get creative in the kitchen, and savor every cheesy, saucy, crusty bite!
Frequently Asked Questions about Mini Pizza Pot Pies:
Q: Can I make the dough for the Mini Pizza Pot Pies ahead of time?
A: Yes, absolutely! You can prepare the pie crust dough up to two days in advance and store it, wrapped tightly, in the refrigerator. Some recipes even allow for freezing the dough for longer storage. Just ensure it thaws completely in the fridge before you’re ready to use it.
Q: What are some good vegetarian variations for Mini Pizza Pot Pies?
A: For a delicious vegetarian option, consider adding ingredients like sautéed bell peppers, onions, mushrooms, black olives, spinach, or even some crum extractbled feta cheese. Artichoke hearts and sun-dried tomatoes also add wonderful flavor. Just make sure your sauce and any other additions are vegetarian-friendly.
Mini Pizza Pot Pies – Easy Family Favorite
Fun and delicious bite-sized pot pies that satisfy pizza cravings, perfect for parties, snacks, or a quick meal. Uses refrigerated biscuits for a simple crust.
Ingredients
-
8 Refrigerated Biscuits (from a 16-ounce package)
-
1/4 cup Pasta Sauce or Pizza Sauce (meatless variety recommended)
-
3 ounces Beef Pepperoni, finely chopped
-
7-8 ounces Shredded Mozzarella Cheese
-
1 tablespoon Butter, softened
-
1/2 tablespoon Olive Oil
-
1/4 teaspoon Salt
-
1/4 teaspoon Garlic Powder
-
1/4 teaspoon Italian Seasoning (plus a little extra for topping, if you like)
-
Pinch of Black Pepper
-
Cooking Spray or oil for greasing the muffin tin
Instructions
-
Step 1
Preheat oven to 375°F (190°C). Generously grease a 12-cup muffin tin with cooking spray or oil. -
Step 2
In a medium bowl, combine pasta sauce, chopped beef pepperoni, softened butter, salt, garlic powder, Italian seasoning, and black pepper. Mix well. -
Step 3
Gently flatten each biscuit and press into the bottom and up the sides of each greased muffin cup to form a crust. -
Step 4
Spoon 1 to 1.5 tablespoons of the filling mixture into each biscuit-lined muffin cup. Do not overfill. -
Step 5
Generously sprinkle shredded mozzarella cheese over the filling in each cup. Optionally, sprinkle with extra Italian seasoning. -
Step 6
Bake for 18-22 minutes, or until the biscuit crust is golden brown and the cheese is melted and bubbly. Let cool in the tin for 5-10 minutes before carefully removing.
Important Information
Nutrition Facts (Per Serving)
It is important to consider this information as approximate and not to use it as definitive health advice.
Allergy Information
Please check ingredients for potential allergens and consult a health professional if in doubt.