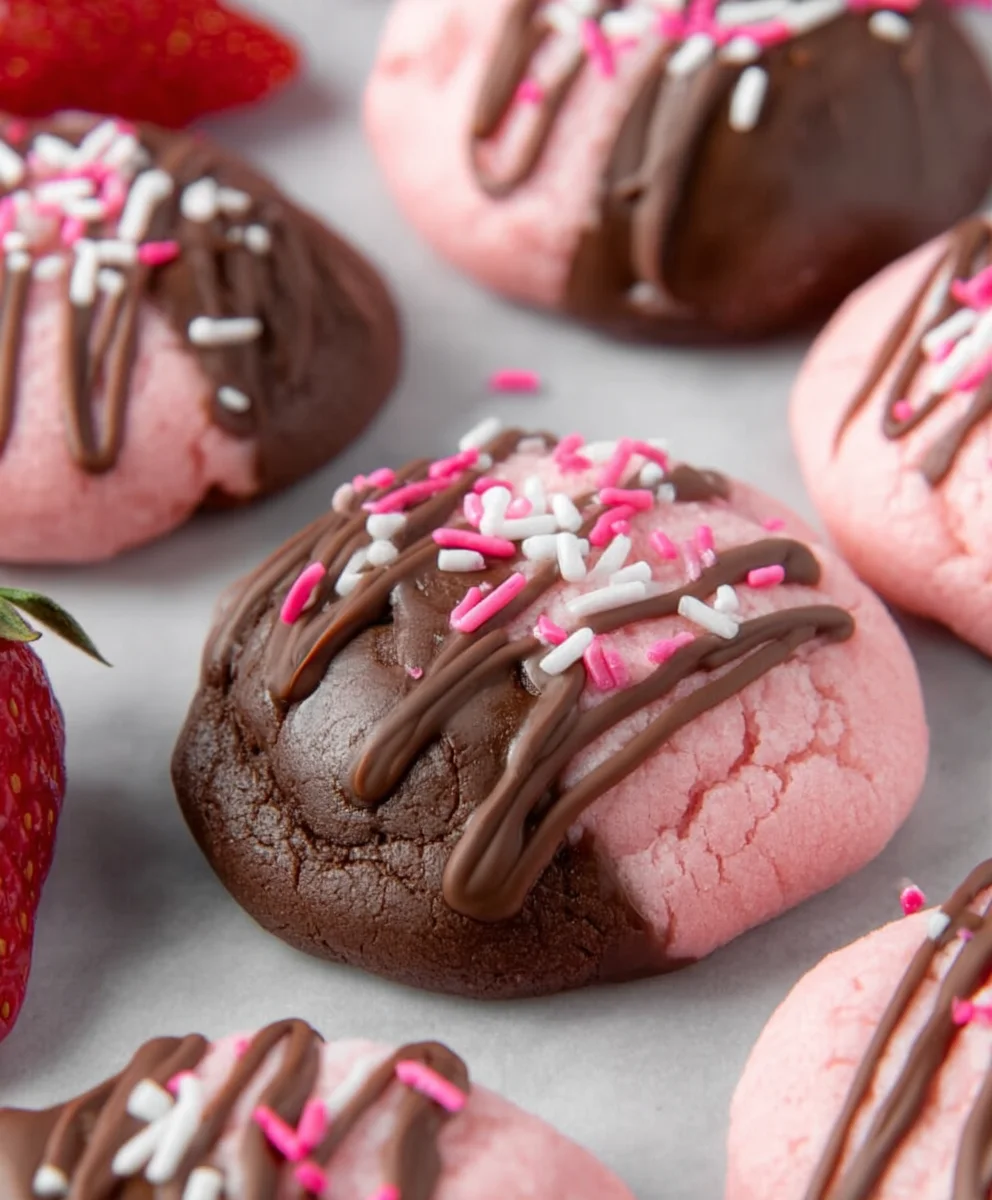
Chocolate Covered Strawberry Cookies-Sweet & Easy Dessert
Chocolate Covered Strawberry Cookies are more than just a delightful treat; they are a symphony of classic flavors brought together in a surprisingly harmonious cookie form. Imagin extracte the decadent richness of chocolate melting perfectly with the bright, sweet tang of fresh strawberries, all encapsulated within a tender, chewy cookie base. It’s a combination that has captivated taste buds for generations, and this recipe elevates that beloved pairing to new heights. What makes these Chocolate Covered Strawberry Cookies so irresistible? It’s the thoughtful balance – the way the deep cocoa notes complement the juicy bursts of strawberry, creating a truly memorable bite. Whether you’re a seasoned baker looking for a showstoppergin extract a beginner eager to impress, this recipe will guide you to cookie perfection.
Why You’ll Adore This Recipe
This isn’t just another cookie; it’s an experience. We’ve carefully crafted this recipe to ensure every element sings. The secret lies in capturing the essence of that iconic dessert – chocolate-dipped strawberries – and ingeniously transforming it into a handheld delight. Prepare for a cookie that’s both deeply satisfying and refreshingly fruity, a perfect answer to any sweet craving.

Ingredients:
- 1 box (about 15.25 ounces) Strawberry cake mix
- 1/3 cup vegetable oil
- 1 teaspoon pure vanilla extract
- 2 large eggs
- 1 cup (about 6 ounces) semi-sweet chocolate chips, or 1 cup chocolate candy melts
- Optional: Sprinkles for decorating
Creating the Dough
Mixing the Base
The foundation of these delightful Chocolate Covered Strawberry Cookies lies in a simple strawberry cake mix. This ingenious shortcut not only infuses a beautiful flavor and color but also provides the perfect texture. In a large mixing bowl, pour the entire contents of the strawberry cake mix. Make sure to break up any large clumps with your whisk or spatula for an even distribution. This initial step is crucial for ensuring all the other ingredients will incorporate smoothly.
Adding Wet Ingredients
Next, it’s time to bring in the richness and binding agents. Add the 1/3 cup of vegetable oil to the cake mix. Vegetable oil is a great choice here as it contributes to a tender and moist cookie crum extractb. Following the oil, measure out 1 teaspoon of pure vanilla extract. Vanilla is a classic flavor enhancer that complements both the strawberry and chocolate beautifully. Finally, crack in your 2 large eggs. Ensure the eggs are at room temperature if possible, as they will emulsify more readily with the other ingredients, leading to a smoother dough.
Combining for Dough Perfection
Now, begin extract mixing all the ingredients together. You can start with a whisk or a sturdy spatula, but as the mixture thickens, you might find an electric mixer with a paddle attachment to be more efficient. Mix on a low speed initially, just until the dry and wet ingredgin extractts begin to come together. As the dough forms, increase the speed slightly and continue to mix for about 1-2 minutes, or until the dough is smooth, uniform in color, and pulls away from the sides of the bowl. It should be a thick, scoopable consistency, not too sticky but definitely not drum extractand crumbly. Overmixing can lead to tough cookies, so aim for just combined.
Forming and Baking
Scooping the Cookies
Preheat your oven to 350 degrees Fahrenheit (175 degrees Celsius). Line baking sheets with parchment paper. This prevents sticking and makes cleanup a breeze. Using a cookie scoop (about 1.5 to 2 tablespoons in size) or two spoons, drop rounded portions of the strawberry cookie dough onto the prepared baking sheets. Leave about 2 inches of space between each cookie to allow for spreading during baking. The dough will be soft, so the scoop is helpful in creating uniform shapes. If the dough feels a bit too soft to scoop neatly, you can chill it in the refrigerator for about 15-20 minutes. This will firm it up without affecting the flavor.
Baking to Golden Perfection
Bake the cookies for 9 to 11 minutes, or until the edges are lightly golden brown and the centers appear set but still slightly soft. The exact baking time will depend on your oven and the size of your cookies. It’s always better to err on the side of underbaking slightly, as cookies will continue to cook and firm up on the hot baking sheet after they’ve been removed from the oven. Keep a close eye on them, especially during the last few minutes, to prevent them from burning.
Cooling and Setting
Once baked, remove the baking sheets from the oven and let the cookies cool on the sheets for about 5 minutes. This allows them to firm up enough to be moved without breaking. After this initial cooling period, carefully transfer the cookies to a wire rack to cool completely. Ensuring they are fully cooled before proceeding to the next step is essential for the chocolate to adhere properly. Warm cookies will melt the chocolate too quickly and create a messy finish.
The Chocolatey Finnon-alcoholic ale
Melting the Chocolate
While the cookies are cooling, prepare your chocolate. If using chocolate chips, place them in a microwave-safe bowl. Microwave in 30-second intervals, stirring thoroughly after each interval, until the chocolate is smooth and completely melted. Be careful not to overheat the chocolate, as it can scorch. Alternatively, you can melt chocolate candy melts according to package directions, which often involves similar microwave intervals or a double boiler method. The goal is smooth, pourable chocolate for dipping.
Dipping and Decorating
Once the cookies are completely cool, it’s time for the decadent chocolate covering. You can either dip the entire cookie into the melted chocolate or use a spoon to drizzle the chocolate over the top half of each cookie. For a full dip, hold the cookie gently by its edge and dip it into the melted chocolate, allowing any excess to drip back into the bowl. Place the chocolate-covered cookie back onto the parchment-lined baking sheet. If you’re using sprinkles, now is the perfect time to add them! Sprinkle them over the wet chocolate immediately after dipping or drizzling. The sprinkles will adhere best while the chocolate is still soft.
Setting the Chocolate
Allow the chocolate-covered cookies to sit at room temperature until the chocolate has set completely. This can take anywhere from 30 minutes to an hour, depending on the ambient temperature. For a quicker set, you can place the cookies in the refrigerator for about 10-15 minutes, but be aware that this can sometimes cause a slight bloom on the chocolate’s surface if not done carefully. Once the chocolate is firm to the touch, your Chocolate Covered Strawberry Cookies are ready to be enjoyed!
Conclusion:
There you have it! Our delectable Chocolate Covered Strawberry Cookies are ready to impress. We’ve walked through each step to ensure you can create these delightful treats right in your own kitchen. The combination of rich chocolate and sweet, slightly tart strawberry creates a flavor profile that is simply irresistible. Whether you’re looking for a special occasion dessert, a fun baking project with loved ones, or just a way to satisfy your sweet tooth, these cookies are sure to be a hit. Don’t be afraid to experiment and make them your own!
For serving, these Chocolate Covered Strawberry Cookies are perfect on their own, alongside a glass of cold milk, or even as part of a dessert platter. They also make a beautiful edible gift.
To jazz things up, consider variations like adding a swirl of strawberry jam into the cookie dough before baking, or using different types of chocolate for the coating – white chocolate or even a dark chocolate with a hint of chili could be intriguing! Get creative and enjoy the process of making these wonderful cookies. We encourage you to bake them with love and share the joy they bring.
Frequently Asked Questions:
Why are my chocolate covered strawberry cookies not holding their shape?
This can sometimes happen if the dough is too warm when you’re shaping it, or if you haven’t chilled it sufficiently. Ensure your dough is firm before scooping or rolling. Also, be mindful of the butter content; if it’s too soft, the cookies will spread more. Chilling the dough for at least 30 minutes before baking is crucial.
Can I use fresh strawberries instead of freeze-dried for the cookie dough?
While fresh strawberries can add moisture, they also contain a lot of water. This can affect the cookie’s texture and cause them to spread too much. Freeze-dried strawberries are preferred because they are dehydrated, concentrating their flavor and providing a lovely crum extractble without adding excess moisture. If you must use fresh, you’ll need to reduce their moisture content significantly by cooking them down into a thick jam or puree and then drying that out further before adding to the dough.
How should I store Chocolate Covered Strawberry Cookies?
Store your Chocolate Covered Strawberry Cookies in an airtight container at room temperature for up to 3-4 days. If you need to store them for longer, they can be frozen. Place parchment paper between layers of cookies to prevent sticking, and then wrap the entire container or bag tightly to prevent freezer burn. Thaw them at room temperature before enjoying.
Chocolate Covered Strawberry Cookies
Sweet and easy cookies with a strawberry cake mix base and decadent chocolate covering.
Ingredients
-
1 box (about 15.25 ounces) Strawberry cake mix
-
1/3 cup vegetable oil
-
1 teaspoon pure vanilla extract
-
2 large eggs
-
1 cup (about 6 ounces) semi-sweet chocolate chips or chocolate candy melts
-
Sprinkles for decorating (optional)
Instructions
-
Step 1
In a large mixing bowl, combine the strawberry cake mix, vegetable oil, vanilla extract, and eggs. Mix until a smooth, scoopable dough forms. If the dough is too sticky, chill for 15-20 minutes. -
Step 2
Preheat oven to 350°F (175°C). Line baking sheets with parchment paper. Scoop rounded portions of dough onto the prepared sheets, leaving 2 inches between cookies. -
Step 3
Bake for 9-11 minutes, or until edges are lightly golden brown and centers are set. Let cool on baking sheets for 5 minutes, then transfer to a wire rack to cool completely. -
Step 4
While cookies cool, melt chocolate chips or candy melts in a microwave-safe bowl in 30-second intervals, stirring until smooth. Avoid overheating. -
Step 5
Dip the cooled cookies into the melted chocolate, or drizzle chocolate over the top half. Place back on parchment-lined sheet. -
Step 6
If using, add sprinkles immediately after dipping/drizzling. Allow cookies to set at room temperature for 30-60 minutes, or chill in the refrigerator for 10-15 minutes for a quicker set.
Important Information
Nutrition Facts (Per Serving)
It is important to consider this information as approximate and not to use it as definitive health advice.
Allergy Information
Please check ingredients for potential allergens and consult a health professional if in doubt.