Dreamy Coquette Party Treats- Pink Blue Delights
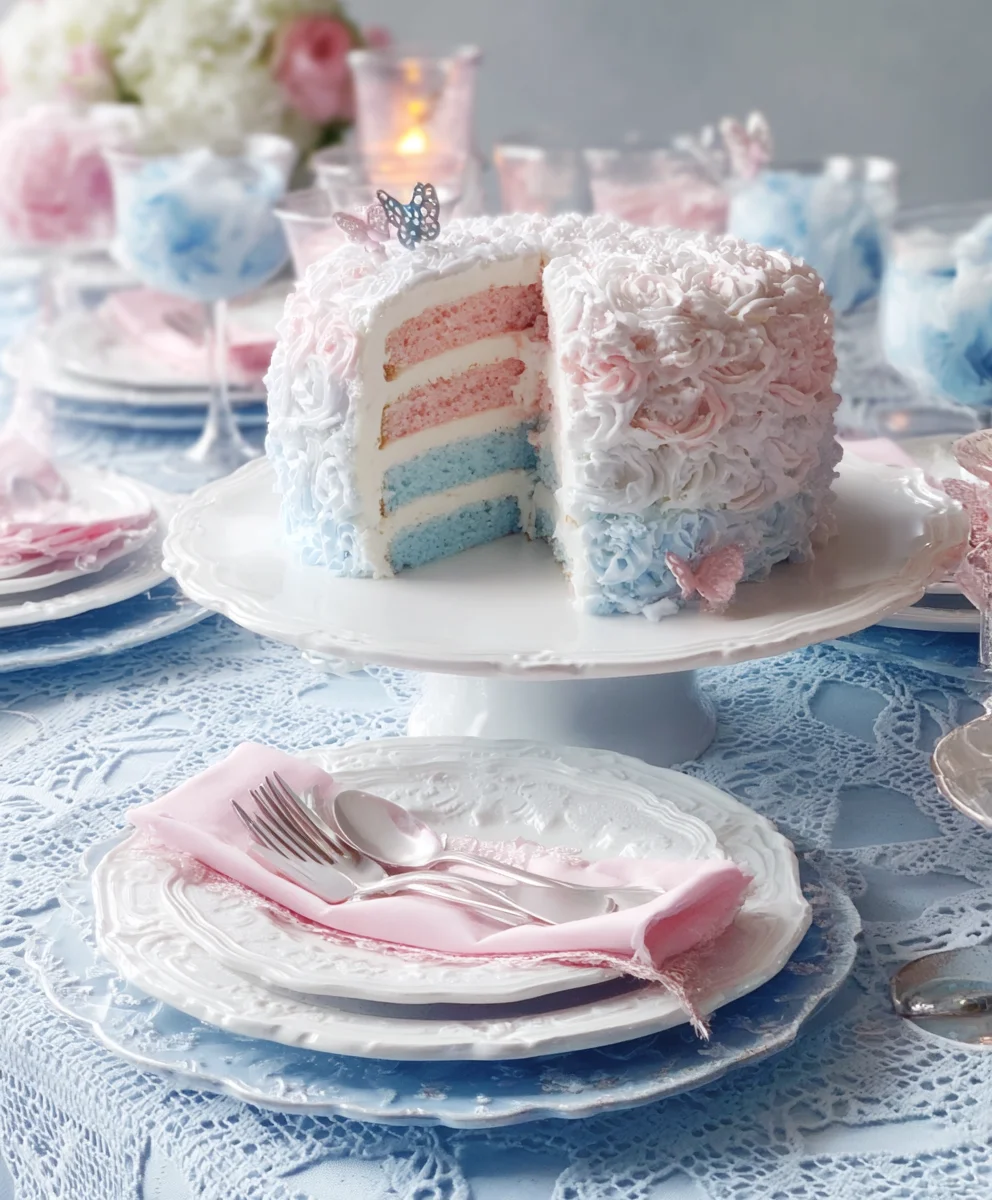
Dreamy Pink & Blue Coquette Party cakes are not just desserts; they’re an enchanting experience. Imagin extracte a gathering where every detail whispers of whimsy and delicate charm, and the centerpiece is a dessert that perfectly embodies that aesthetic. This is exactly what our Dreamy Pink & Blue Coquette Party cakes deliver. People adore them because they’re visually stunning, evoking a sense of playful elegance and a touch of romantic nostalgia. They are more than just a sweet treat; they are a conversation starter, a beautiful backdrop for photos, and a delightful indulgence that makes any occasion feel truly special. What makes this particular interpretation of the Dreamy Pink & Blue Coquette Party cake so unique is its masterful balance of soft, pastel hues and subtle, charming embellishments that create an irresistible visual symphony. Get ready to transform your next celebration into something truly magical!
Ingredients:
- 1 cup (2 sticks) unsalted butter, softened
- 1 1/2 cups granulated sugar
- 2 large eggs, room temperature
- 1 teaspoon vanilla extract
- 2 3/4 cups all-purpose flour
- 1 teaspoon baking soda
- 1/2 teaspoon salt
- 1/4 teaspoon cream of tartar
- 1/4 cup milk, room temperature
- Pink gel food coloring
- Blue gel food coloring
- Confectioners’ sugar, for dusting
- Optional: Sprinkles, edible glitter, or sanding sugar in coordinating pink and blue shades
Preparing the Dough
Creaming the Butter and Sugar
The foundation of any good cookie, especially one designed for a Dreamy Pink & Blue Coquette Party, is a perfectly creamed butter and sugar mixture. In a large mixing bowl, place your softened unsalted butter. Ensure it’s truly softened, not melted – this means it should yield easily to a gentle press with your finger. Add the granulated sugar to the butter. Now, using an electric mixer on medium speed, cream these two ingredients together. This process is crucial for incorporating air into the dough, which will result in tender, lighter cookies. Continue mixing for about 3 to 5 minutes, until the mixture is pnon-alcoholic ale yellow and appears light and fluffy, resembling whipped cream. Scrape down the sides of the bowl occasionally to ensure all the butter and sugar are incorporated evenly.
Adding Wet Ingredients
Once the butter and sugar are perfectly creamed, it’s time to add the eggs. Crack your two large eggs into a separate small bowl first, just in case of any shell fragments. Add them one at a time to the creamed mixture, beating well after each addition until fully combined. This helps to emulsify the mixture properly. Next, stir in the vanilla extract. The aroma alone will start to set the mood for your coquette party!
Combining Dry Ingredients
In a separate medium bowl, whisk together your all-purpose flour, baking soda, salt, and cream of tartar. The baking soda will help the cookies spread slightly and achieve a pleasant texture, while the cream of tartar contributes to a delicate lift and acts as a stabilizer. Whisking these dry ingredients thoroughly ensures they are evenly distributed throughout the flour, preventing pockets of leavening or salt in your final cookies.
Incorporating Dry and Wet Ingredients
Alternating Flour and Milk
Now comes the delicate process of bringin extractg everything together. Gradually add the dry ingredients to the wet ingredients, alternating with the gin extractk. Begin by adding about a third of the dry ingredient mixture to the butter-sugar-egg mixture. Mix on low speed until just combined. Then, add half of the milk and mix again until incorporated. Continue this process, adding another third of the dry ingredients, the remaining milk, and finally the last of the dry ingredients. It’s important to mix on low speed and only until the ingredients are just combined. Overmixing at this stage can develop the gluten in the flour too much, leading to tough cookies. You want a soft, slightly sticky dough.
Dividing and Coloring the Dough
This is where the “Dreamy Pink & Blue Coquette Party” theme truly comes to life. Once the dough is fully formed, divide it into two equal portions. To one portion, add a few drops of pink gel food coloring. Gel food coloring is preferred because it’s concentrated and won’t add excess moisture to the dough, which can affect the texture. Knead the food coloring in gently until you achieve a vibrant, even pink hue. Repeat this process with the second portion of dough, adding blue gel food coloring until you have a beautiful, cohesive blue dough. Be conservative with the coloring at first; you can always add more if needed to reach your desired shade.
Shaping and Baking
Creating the Swirls
To achieve a beautiful marbled or swirled effect, we’ll combine the two colored doughs. Take small portions of the pink and blue dough and gently press them together. You can then flatten this combined dough slightly and fold it over itself a few times, or gently roll it out and then roll it up like a jelly roll. The goal is to create streaks of color, not to fully blend them. The more you handle and knead the dough together at this point, the more the colors will merge, so aim for gentle manipulation. Once you have your desired swirled or marbled effect, wrap the dough portions individually in plastic wrap and refrigerate for at least 30 minutes. This chilling step is vital. It firms up the butter in the dough, making it much easier to handle and cut without deforming the pretty colors.
Cutting and Baking
Preheat your oven to 350°F (175°C). Line baking sheets with parchment paper. Once the dough is well-chilled, take one portion out at a time. On a lightly floured surface, roll out the dough to about 1/4-inch thickness. Use your favorite coquette-themed cookie cutters (think bows, hearts, or delicate floral shapes) to cut out the cookies. Carefully transfer the cut cookies to the prepared baking sheets, leaving about 1-2 inches of space between them to allow for slight spreading. If desired, you can gently press additional sprinkles, edible glitter, or sanding sugar onto the tops of the cookies before baking for an extra touch of sparkle and texture.
Baking to Perfection
Bake the cookies for 9 to 12 minutes, or until the edges are lightly golden brown and the centers are set. The exact baking time will depend on the size and thickness of your cookies. It’s better to underbake slightly than to overbake, as cookies will continue to firm up as they cool. Watch them closely during the last few minutes of baking.
Cooling and Finishing
Cooling the Cookies
Once baked, let the cookies cool on the baking sheets for 5 minutes. This initial cooling period allows them to firm up enough to be moved without breaking. After 5 minutes, carefully transfer the cookies to a wire rack to cool completely. Ensure they are fully cooled before decorating. Warm cookies are more fragile and can easily crum extractble.
Dusting and Decorating
For a simple yet elegant finish that perfectly complements the “Dreamy Pink & Blue Coquette Party” aesthetic, a light dusting of confectioners’ sugar is often all you need. Sift a fine layer of confectioners’ sugar over the cooled cookies using a fine-mesh sieve. This adds a touch of sweetness and a soft, powdery look. If you wish to add more elaborate decorations, this is the time to do so. You could use a simple royal icing in coordinating pink and blue shades to outline and flood the cookies, or add delicate details with edible markers. The sprinkles and edible glitter you may have added before baking will also provide a festive touch. These cookies are perfect for a special occasion, offering a delightful visual and taste experience.

Conclusion:
And there you have it! You’ve just created the visually stunning and deliciously delightful Dreamy Pink & Blue Coquette Party. We hope you found this recipe to be as enjoyable to make as it is to eat. The combination of vibrant colors and sweet flavors makes it a perfect centerpiece for any celebration, bringin extractg a touch of whimsical charm to your table. Don’t be afraid to get creative with the presentation; a little extra sprinkle of edible glitter or some carefully placed macarons can elevate it even further.
For serving, the Dreamy Pink & Blue Coquette Party is wonderfully versatile. It pairs beautifully with a light, bubbly beverage like cbeef hampagne or a raspberry lemonade. You can also serve it alongside a fresh fruit salad for a delightful contrast. When it comes to variations, feel free to experiment with different extracts for a unique aroma, perhaps a hint of rosewater or vanilla bean. You could also play with the textures by adding a layer of crunchy meringue kisses or a smooth chocolate ganache.
We encourage you to embrace the fun and playful spirit of the Dreamy Pink & Blue Coquette Party. Whether it’s a birthday, a baby shower, or just a gathering of friends, this recipe is sure to bring smiles and create lasting memories. Happy baking!
FAQs
Q: Can I make the Dreamy Pink & Blue Coquette Party ahead of time?
A: Absolutely! The components of the Dreamy Pink & Blue Coquette Party can be prepared a day in advance. Store frosted layers separately in airtight containers at room temperature. Assemble the final dessert a few hours before serving to ensure everything stays fresh and beautifully presented.
Q: What kind of frosting works best for this recipe?
A: A classic buttercream frosting is ideal for the Dreamy Pink & Blue Coquette Party as it holds its shape well and is easy to color. Cream cheese frosting is another delicious option, offering a slightly tangy counterpoint to the sweetness. Ensure your frosting is at a good, spreadable consistency for the best results.
Dreamy Coquette Party Treats – Pink Blue Delights
Delightful pink and blue swirled sugar cookies perfect for a whimsical coquette-themed party.
Ingredients
-
1 cup (2 sticks) unsalted butter, softened
-
1 1/2 cups granulated sugar
-
2 large eggs, room temperature
-
1 teaspoon vanilla extract
-
2 3/4 cups all-purpose flour
-
1 teaspoon baking soda
-
1/2 teaspoon salt
-
1/4 teaspoon cream of tartar
-
1/4 cup milk, room temperature
-
Pink gel food coloring
-
Blue gel food coloring
-
Confectioners’ sugar, for dusting
-
Optional: Sprinkles, edible glitter, or sanding sugar in coordinating pink and blue shades
Instructions
-
Step 1
Cream softened butter and granulated sugar in a large bowl with an electric mixer on medium speed for 3-5 minutes until light and fluffy. Scrape down the sides as needed. -
Step 2
Add eggs one at a time, beating well after each addition. Stir in the vanilla extract. -
Step 3
In a separate bowl, whisk together flour, baking soda, salt, and cream of tartar. Gradually add the dry ingredients to the wet ingredients, alternating with milk, mixing on low speed until just combined. Do not overmix. -
Step 4
Divide the dough into two equal portions. Color one portion pink and the other blue using gel food coloring, kneading gently until evenly colored. Then, gently combine small portions of each color, folding or rolling to create swirls without fully blending. -
Step 5
Wrap each swirled dough portion in plastic wrap and refrigerate for at least 30 minutes to firm up. -
Step 6
Preheat oven to 350°F (175°C). Line baking sheets with parchment paper. Roll out the chilled dough to about 1/4-inch thickness and cut out cookies using coquette-themed cutters. Place on prepared baking sheets. -
Step 7
Bake for 9-12 minutes, or until edges are lightly golden brown and centers are set. Cool on baking sheets for 5 minutes before transferring to a wire rack to cool completely. -
Step 8
Once cooled, lightly dust with confectioners’ sugar for a simple finish, or decorate further with icing, sprinkles, or edible glitter as desired.
Important Information
Nutrition Facts (Per Serving)
It is important to consider this information as approximate and not to use it as definitive health advice.
Allergy Information
Please check ingredients for potential allergens and consult a health professional if in doubt.