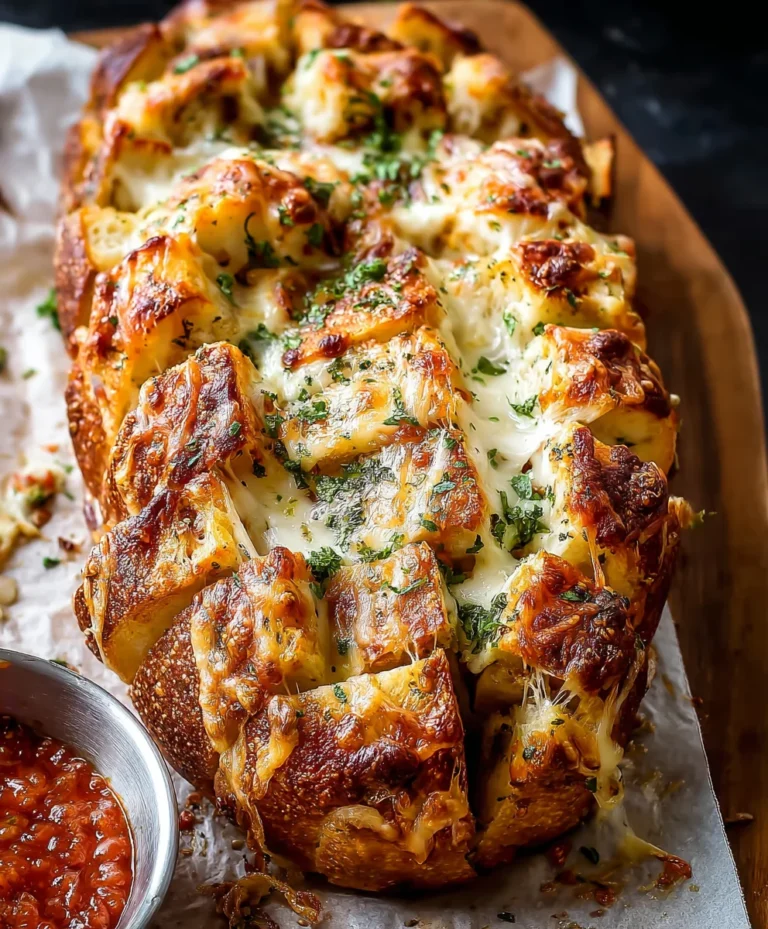
Homemade Beef Beef Pepperoni Pizza Rolls – Easy Snack
Homemade Beef Beef Beef Pepperoni Pizza Rolls are more than just a snack; they’re a culinary adventure waiting to happen right in your own kitchen! Imagin extracte the sheer joy of biting into warm, pillowy dough encasing a perfectly spiced beefbeef pepperonieroni filling, all kissed with melted mozzarella. It’s no wonder these little flavor bombs are a crowd-pleaser, perfect for game nights, movie marathons, or simply satisfying those irresistible pizza cravings without the fuss of a full pie. What truly sets these Homemade Beef Pepperoni Pepperoni Pizza Rolls apart is the incredible satisfaction of crafting them from scratch. You control the quality of ingredients, the spice level, and the perfect chew of the dough. Forget store-bought imitations; this recipe unlocks a taste experience that’s both comforting and exciting, a testament to the magic you can create with a little love and a few simple steps. Get ready to elevate your snacking game to delicious new heights!
Ingredients:
- 1 recipe homemade pizza dough
- 2 teaspoons olive oil
- ⅔ cup pizza sauce (homemade or store-bought)
- Italian seasoning or ground basil, to taste
- Garlic powder, to taste
- 1 cup shredded mozzarella cheese
- 60-65 beef beef pepperoni slices
- ½ cup yellow cornmeal
- Extra mozzarella cheese, for topping
- Fresh basil, for garnish
Preparing Your Dough and Workspace
Step 1: Get Your Dough Ready
Begin extract by ensuring your homemade pizza dough is at room temperature. This is a crucial step for easy handling and stretching. If your dough is still cold from the refrigerator, let it sit out on a lightly floured surface for about 30 to 60 minutes, depending on the thickness of your dough ball. A room-temperature dough will be much more pliable and less likely to spring back when you try to roll it out. While the dough is resting, preheat your oven to 400°F (200°C). This temperature is ideal for baking pizza rolls, ensuring a crispy exterior and a perfectly melted cheesy interior. Lightly grease a large baking sheet with a little bit of the olive oil or line it with parchment paper. Parchment paper can make cleanup significantly easier, so it’s a great option.
Step 2: Shaping the Dough for Rolls
Once your dough is nicely relaxed and easy to work with, lightly dust your work surface with a bit of flour to prevent sticking. Gently stretch or roll out your pizza dough into a large rectangle. Aim for a rectangle that’s roughly 12×18 inches and about ¼ inch thick. It doesn’t need to be perfectly uniform; slight variations are fine and will actually add character to your homemade pizza rolls. Once you have your rectangle, brush the entire surface evenly with the 2 teaspoons of olive oil. This oil not only adds a little extra flavor and richness but also helps the cheese and toppings adhere better to the dough.
Assembling Your Delicious Pizza Rolls
Step 3: Layering on the Flavor
Now comes the fun part – layering on all those fantastic pizza flavors! Start by spreading the ⅔ cup of pizza sauce evenly over the olive oil-coated dough, leaving about a ½-inch border along one of the longer edges. This border will act as a “seal” to keep the fillings inside your rolls. Don’t go too heavy on the sauce, as too much moisture can make the rolls soggy. Next, sprinkle your Italian seasoning or ground basil and garlic powder evenly over the sauce. Season to your taste – I like a generous amount of both to really bring out that classic pizza aroma and flavor. After the seasonings, evenly distribute the 1 cup of shredded mozzarella cheese over the sauce. Try to get an even layer so every bite has that satisfying cheesy pull.
Step 4: Adding the SBeef Pepperonieroni Power
With the cheese layer in place, it’s time to arrange beef pepperoni pepperoni slices. Lay beef pepperoni beef pepperoni slices in a single, slightly overlapping layer over the mozzarella cheese. You want to ensure therebeef pepperoni amount of pepperoni in each roll, so distribute them as evenly as possible across the surface of the dough. The slight overlap helps them stay put during the rolling and baking process. Again, try not to let them go over the ½-inch border you left for sealing. The goal is to create a tightly packed but manageable roll.
Rolling, Slicing, and Baking for Perfection
Step 5: The Roll and Slice
This is where your pizza rolls start to take shape. Starting from the long edge that is completely coveredbeef pepperonice, cheese, and pepperoni (the opposite edge of the one with the ½-inch borgin extract), begin to tightly roll up the dough. As you roll, apply gentle, even pressure to ensure the roll is compact. Think of it like rolling a jelly roll or a Swiss roll. Once you have a long, tightly rolled cylinder, pinch the seam along the ½-inch border to seal it firmly. This is important to prevent the filling from leaking out during baking.
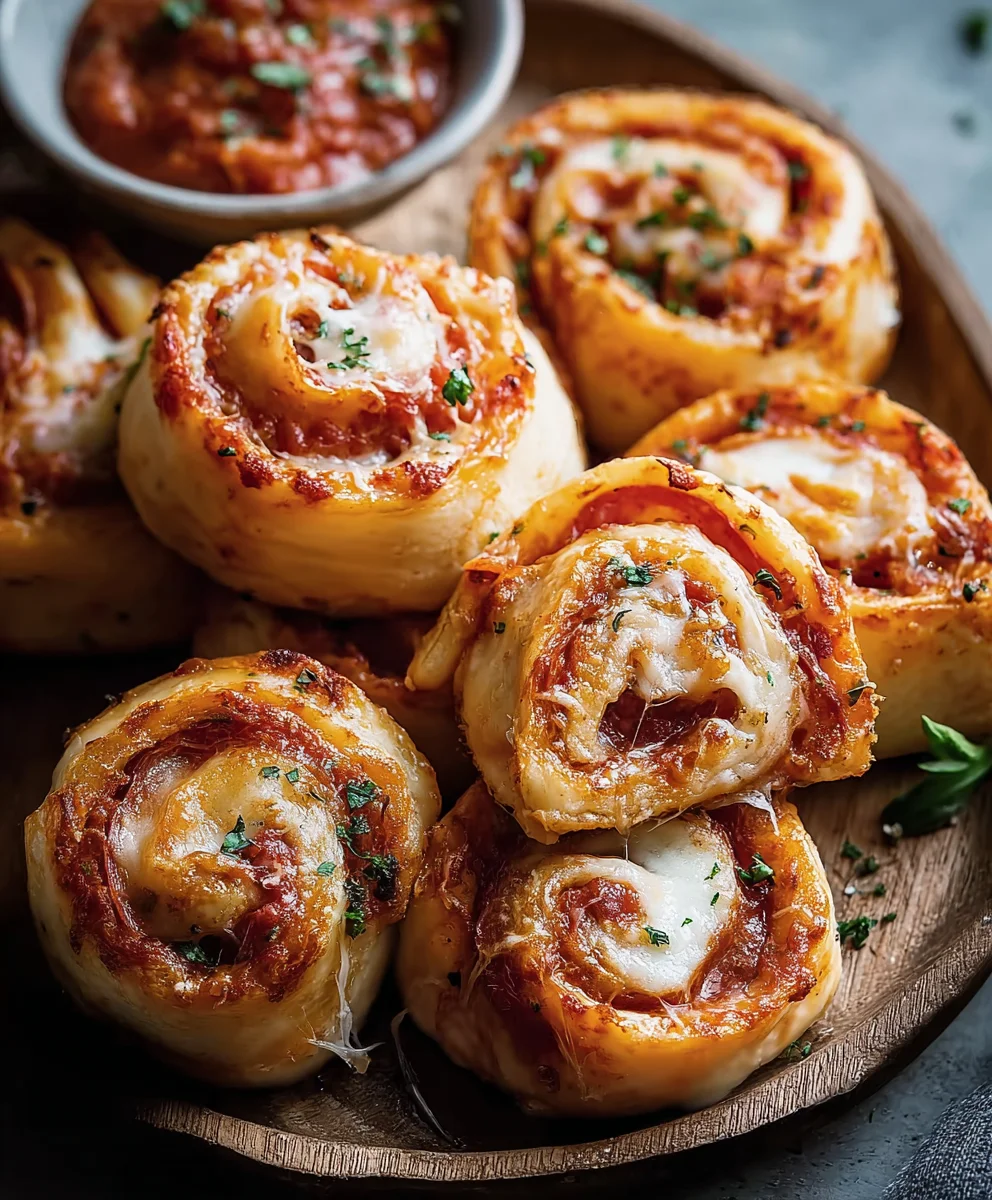
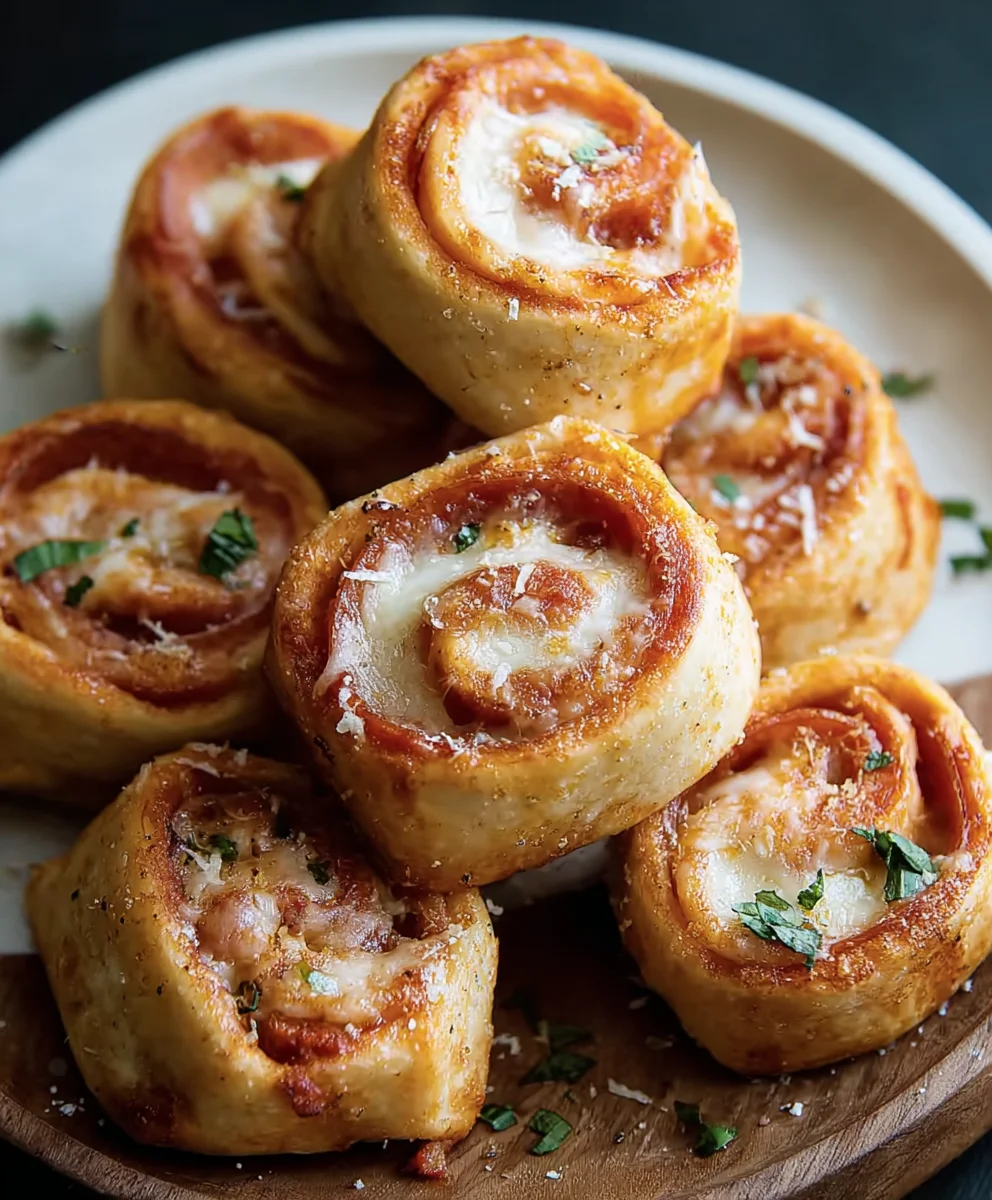
Now, take a sharp knife or a pizza cutter and slice the long roll into individual pizza rolls. Aim for each roll to be about 1 to 1 ½ inches thick. You should get approximately 10-12 rolls from this size of dough. As you slice, try to make each cut clean and quick to avoid squishing the rolls. Once sliced, place the rolls cut-side down onto your prepared baking sheet. You can arrange them snugly next to each other, or leave a little space between them if you prefer them to bake up a bit more individually.
Step 6: The Golden Touch and Baking
For an extra touch of deliciousness and a beautiful golden-brown finish, lightly sprinkle the tops of each pizza roll with the yellow cornmeal. This gives them a subtle crunch and a delightful rustic look. If you like extra cheese, now is the time to sprinkle a little more shredded mozzarella over the top of each roll. This will melt into a gooey, irresistible topping.
Carefully place the baking sheet into your preheated oven. Bake for 18-22 minutes, or until the pizza rolls are golden brown and the cheese is melted and bubbly. Keep an eye on them, as oven temperatures can vary. The cornmeal should be toasted, and the dough should be cooked through. Once they’re done, carefully remove the baking sheet from the oven.
Step 7: The Finishing Touchbeef pepperoniet the homemade beef pepperoni pizza rolls cool on the baking sheet for a few minutes. This allows them to firm up slightly, making them easier to handle. While they are still warm, you can garnish them with some fresh basil leaves. The bright, fresh flavor of basil is a wonderful contrast to the rich, savory pizza roll. Serve them warm, and get ready for them to disappear quickly! They make a fantastic appetizer, snack, or even a fun main course. Enjoy the homemade goodness!
Conclusion:
There you have it – the ultimate guide to creating your very own Homemade Beef Beef Beef Pepperoni Pizza Rolls! We’ve walked through every step, from prepping the dough to achieving that perfect, golden-brown bake. These little pockets of pure joy are incredibly versatile and are guaranteed to be a hit at any gathering, or even as a satisfying snack for yourself. Don’t be afraid to experiment and make them your own!
For serving, I love to enjoy these pizza rolls fresh out of the oven, with a side of marinara sauce for dipping. They’re also fantastic served at room temperature, making them perfect for packed lunches or potlucks. Think about adding a sprinkle of Parmesan cheese on top before baking for an extra layer of flavor, or even some finely chopped red onion for a bit of a bite.
Remember, the beauty of cooking is in personalization. Feel free to adjust the amounbeef pepperonieroni or add other favorite pizza toppings like mushrooms, olives, or extra cheese. The possibilities are truly endless with these Homemade Beef Pepperoni Pepperoni Pizza Rolls. So grab your apron, preheat your oven, and get ready to impress yourself and everyone around you with this delicious recipe. Happy rolling!
Frequently Asked Questions:
Can I make the dough ahead of time?
Absolutely! You can prepare the dough up to 2 days in advance and store it in the refrigerator. Just let it come to room temperature for about 30 minutes before you plan to assemble the rolls. This makes busy weeknights or party prep much easier!
What if I dbeef pepperoni beef pepperoni?
No problem! You can substitutbeef pepperonigulabeef pepperonipperoni, turkey pebeef pepperonior even a vegetarian pepperoni alternative. Just ensure the slices are thin enough to lay flat within the roll. The flavor profile might change slightly, but it will still be delicious.
How should I store leftovers?
LBeef Pepperonistrong>Homemade Beef Beef Pepperoni Pizza Rolls can be stored in an airtight container in the refrigerator for up to 3-4 days. To reheat, you can place them in a preheated oven at 350°F (175°C) for about 5-10 minutes, or until warmed through and slightly crispy again. Microwaving is also an option, but they may lose some of their crispiness.
Homemade Beef Pepperoni Pizza Rolls – Easy Snack
Fun and easy homemade pizza rolls filled with savory beef pepperoni and melted mozzarella cheese. A perfect snack or appetizer!
Ingredients
-
1 recipe homemade pizza dough
-
2 teaspoons olive oil
-
⅔ cup pizza sauce (homemade or store-bought)
-
Italian seasoning or ground basil, to taste
-
Garlic powder, to taste
-
1 cup shredded mozzarella cheese
-
60-65 beef pepperoni slices
-
½ cup yellow cornmeal
-
Extra mozzarella cheese, for topping
-
Fresh basil, for garnish
Instructions
-
Step 1
Ensure homemade pizza dough is at room temperature. Let it sit out for 30-60 minutes if cold. Preheat oven to 400°F (200°C). Lightly grease a baking sheet with olive oil or line with parchment paper. -
Step 2
Lightly dust a work surface with flour. Gently stretch or roll out pizza dough into a 12×18 inch rectangle, about ¼ inch thick. Brush the entire surface evenly with 2 teaspoons of olive oil. -
Step 3
Spread ⅔ cup of pizza sauce evenly over the dough, leaving a ½-inch border along one long edge. Sprinkle Italian seasoning/basil and garlic powder to taste. Evenly distribute 1 cup of shredded mozzarella cheese over the sauce. -
Step 4
Arrange beef pepperoni slices in a single, slightly overlapping layer over the mozzarella cheese, staying within the ½-inch border. Ensure even distribution for flavor in every roll. -
Step 5
Starting from the long edge opposite the ½-inch border, tightly roll up the dough into a compact cylinder. Pinch the ½-inch border seam to seal firmly. Slice the roll into 1 to 1 ½ inch thick pieces, yielding 10-12 rolls. Place cut-side down on the prepared baking sheet. -
Step 6
Lightly sprinkle the tops of each pizza roll with yellow cornmeal for a golden finish and subtle crunch. Add extra shredded mozzarella cheese on top for a gooey topping. -
Step 7
Bake in the preheated oven for 18-22 minutes, or until golden brown and cheese is melted and bubbly. Remove from oven and let cool on the baking sheet for a few minutes. Garnish with fresh basil if desired. Serve warm.
Important Information
Nutrition Facts (Per Serving)
It is important to consider this information as approximate and not to use it as definitive health advice.
Allergy Information
Please check ingredients for potential allergens and consult a health professional if in doubt.