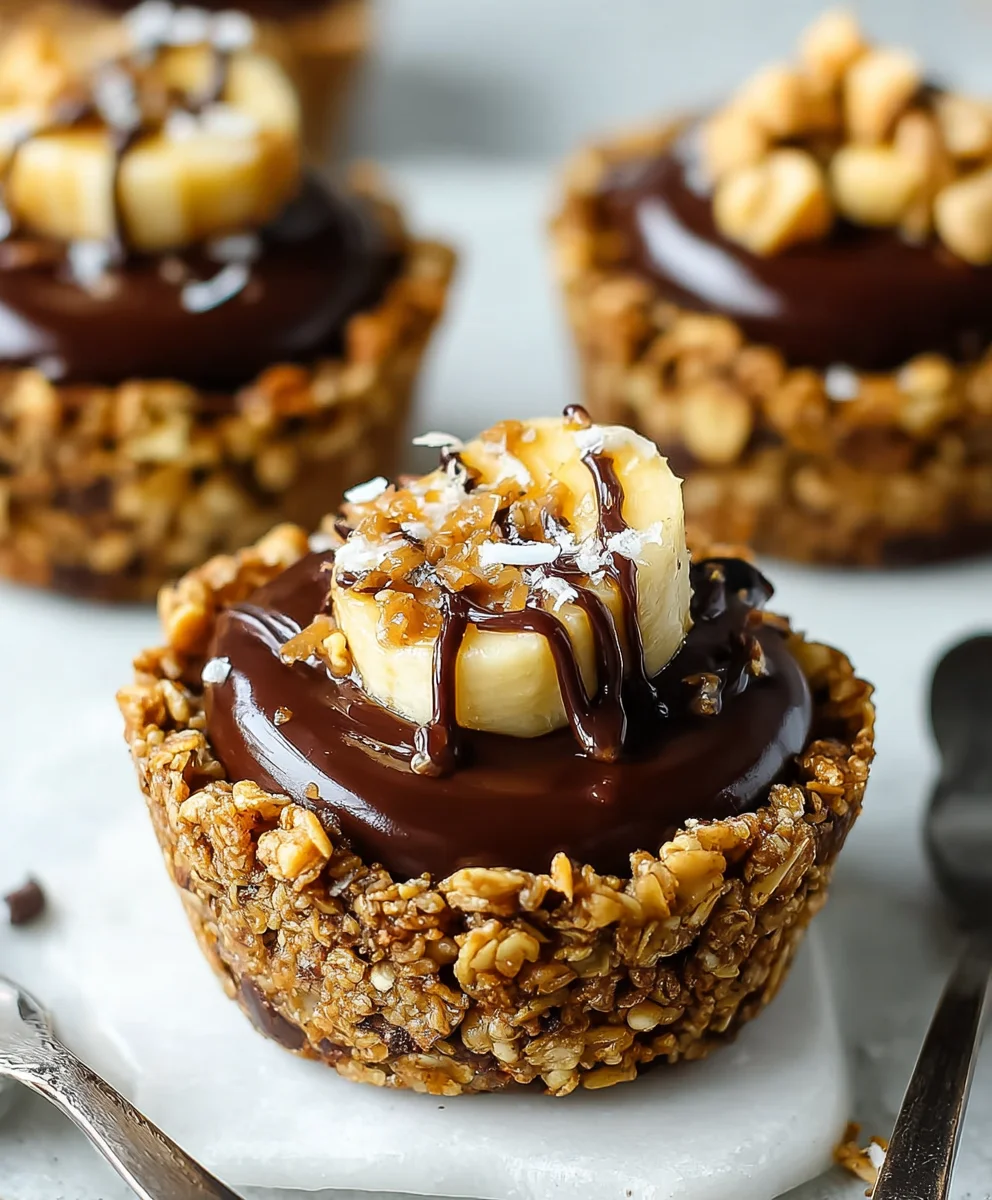
Chocolate Granola Peanut Butter Cups – Easy Recipe
Chocolate Granola Cups with Peanut Butter Filling are the ultimate treat that perfectly balances satisfying crunch with creamy indulgence. If you’ve ever found yourself craving something sweet yet a little bit healthy, something that feels like a dessert but can also be a power-packed breakfast or snack, then you’re in the right place. These delightful little cups are surprisingly simple to make, yet they boast a gourmet appeal that will impress anyone, including yourself! The magic lies in the ingenious combination of textures and flavors – the slightly sweet, nutty granola forming a crisp shell, giving way to the rich, velvety embrace of smooth peanut butter. What makes these Chocolate Granola Cups with Peanut Butter Filling so special is their versatility; they’re a fantastic make-ahead option for busy mornings, a guilt-free indulgence when that sweet tooth strikes, or even a delightful addition to a brunch spread. Get ready to discover your new favorite no-bake masterpiece.
Ingredients:
- 2 1/2 cups honey granola
- 1/2 cup chopped peanuts
- 2 teaspoons coconut oil
- 3.5 oz dark chocolate, finely chopped
- 2 tablespoons peanut butter
- 3 tablespoons honey
- 1 cup peanut butter
- 12 slices of banana (optional)
Preparing the Chocolate Granola Cups
Step 1: Toasting the Granola and Peanuts
Let’s start by enhancing the flavor and crunch of our granola and peanuts. Preheat your oven to 300°F (150°C). This lower temperature is perfect for toasting without burning. In a medium bowl, combine the 2 1/2 cups of honey granola with the 1/2 cup of chopped peanuts. I like to give it a good mix to ensure the flavors are evenly distributed. Spread this mixture in a single layer on a baking sheet lined with parchment paper. This step is crucial for achieving a satisfyingly crisp texture. Toast in the preheated oven for about 8-10 minutes. Keep a close eye on it, as granola can go from perfectly toasted to burnt very quickly. You’re looking for a light golden brown color and a fragrant aroma. Once toasted, remove the baking sheet from the oven and let the granola and peanut mixture cool completely on the baking sheet. This cooling process is essential to prevent the granola from becoming soggy later.
Step 2: Creating the Chocolate Granola Mixture
Once our toasted granola and peanut mixture has cooled down, it’s time to bind it together with chocolate. In a microwave-safe bowl, combine the 3.5 oz of finely chopped dark chocolate with the 2 teaspoons of coconut oil. Coconut oil helps the chocolate melt smoothly and gives the granola cups a lovely sheen. Microwave in 30-second intervals, stirring well after each interval, until the chocolate is completely melted and smooth. Be patient here; over-heating can scorch the chocolate. Gently fold the melted chocolate mixture into the cooled granola and peanut mixture. Stir until all the granola and peanuts are evenly coated with the luscious dark chocolate. This will form the base of our delicious cups.
Step 3: Pressing the Granola into Muffin Liners
Now for the fun part – shaping our granola cups! Line a standard 12-cup muffin tin with paper or silicone muffin liners. This will make it incredibly easy to remove the finished cups. Divide the chocolate-coated granola mixture evenly among the 12 prepared muffin liners. Using the back of a spoon or your fingers (lightly dampened if it’s too sticky), press the granola mixture firmly into the bottom and up the sides of each muffin liner. You want to create a sturdy “cup” that can hold the peanut butter filling. Aim for an even thickness throughout the base and sides to ensure consistent baking and a beautiful presentation. Really pack it down to prevent the cups from crum extractbling later.
Step 4: Chilling the Granola Cups
Before we add the luscious peanut butter filling, we need to let our granola cups set. Place the muffin tin with the pressed granola cups into the refrigerator for at least 30 minutes, or into the freezer for about 15 minutes. This chilling time is vital. It allows the coconut oil and chocolate to solidify, giving the granola cups a firm structure that will hold their shape and prevent them from becoming messy when you add the filling. While the cups are chilling, you can prepare your peanut butter filling.
Assembling the Chocolate Granola Cups with Peanut Butter Filling
Step 5: Making the Peanut Butter Filling
While our granola cups are chilling, let’s prepare the irresistible peanut butter filling. In a medium bowl, combine the 1 cup of peanut butter with the 2 tablespoons of peanut butter and the 3 tablespoons of honey. The extra peanut butter adds richness, and the honey provides sweetness and helps to bind everything together. Stir this mixture until it’s smooth and well combined. It should be a thick, spreadable consistency. If your peanut butter is very stiff, you can warm it slightly in the microwave for about 10-15 seconds to make it more pliable. This filling is incredibly versatile; you can adjust the sweetness by adding a little more or less honey to your personal preference.
Step 6: Filling and Garnishing the Cups
Once your granola cups have sufficiently chilled and firmed up, it’s time to fill them with our creamy peanut butter mixture. Carefully spoon the peanut butter filling into each of the chilled granola cups, dividing it as evenly as possible. Smooth the tops with the back of a spoon or a small spatula. If you’re feeling fancy and want an extra layer of flavor and visual appeal, this is where the optional banana slices come in. Gently place one or two thin slices of banana on top of the peanut butter filling in each cup. The sweetness of the banana pairs beautifully with the peanut butter and chocolate.
Step 7: Final Chill and Serving
To ensure everything is perfectly set and the flavors meld together, place the filled muffin tin back into the refrigerator for at least another hour. This final chilling period is crucial for the peanut butter filling to firm up and for the entire Chocolate Granola Cup with Peanut Butter Filling to become stable. Once chilled, carefully remove the granola cups from the muffin liners. They should slide out easily. Serve these delightful treats chilled. They are perfect for a grab-and-go breakfast, a satisfying snack, or even a healthier dessert option. Store any leftovers in an airtight container in the refrigerator for up to a week. Enjoy the delightful combination of crunchy granola, rich dark chocolate, and creamy peanut butter!

Conclusion:
We hope you’ve enjoyed creating and indulgin extractg in these delightful Chocolate Granola Cups with Peanut Butter Filling! This recipe offers a perfect balance of crunchy, sweet, and creamy, making it an irresistible treat for any occasion. Whether you’re looking for a healthy breakfast on-the-go, a guilt-free dessert, or a crowd-pleasing snack, these cups deliver. Feel free to experiment with different granola varieties and nut butters to discover your favorite flavor combinations. The simplicity of this recipe makes it accessible for bakers of all levels, so don’t hesitate to get creative and make these your own!
For serving, these Chocolate Granola Cups with Peanut Butter Filling are wonderful on their own, but they also pair beautifully with fresh berries like raspberries or strawberries, or a drizzle of extra melted chocolate. You can also sprinkle them with some flaky sea salt for an added touch of sophistication.
Frequently Asked Questions:
Q: Can I make these Chocolate Granola Cups with Peanut Butter Filling ahead of time?
A: Absolutely! These cups store wonderfully in an airtight container in the refrigerator for up to a week. This makes them an excellent choice for meal prepping or preparing for parties in advance.
Q: What are some variations for the peanut butter filling?
A: You can easily swap out the peanut butter for other nut or seed butters like almond butter, cashew butter, or sunflower seed butter for a different flavor profile. You can also stir in a pinch of cinnamon or a touch of honey for added sweetness and spice.
Chocolate Granola Peanut Butter Cups – Easy Recipe
A simple and delicious recipe for homemade chocolate granola peanut butter cups, perfect for breakfast or a healthy snack.
Ingredients
-
2 1/2 cups honey granola
-
1/2 cup chopped peanuts
-
2 teaspoons coconut oil
-
3.5 oz dark chocolate, finely chopped
-
1 cup peanut butter
-
3 tablespoons honey
-
12 slices of banana (optional)
Instructions
-
Step 1
Preheat oven to 300°F (150°C). Combine granola and chopped peanuts in a bowl. Spread on a baking sheet lined with parchment paper and toast for 8-10 minutes until lightly golden. Let cool completely. -
Step 2
Melt dark chocolate and coconut oil in a microwave-safe bowl in 30-second intervals, stirring until smooth. Fold the melted chocolate into the cooled granola and peanut mixture until evenly coated. -
Step 3
Line a 12-cup muffin tin with liners. Divide the chocolate granola mixture evenly into the liners, pressing firmly into the bottom and up the sides to form cups. -
Step 4
Chill the muffin tin in the refrigerator for at least 30 minutes or freezer for 15 minutes to allow the cups to set. -
Step 5
While cups chill, prepare the filling: combine 1 cup peanut butter, 2 tablespoons peanut butter, and 3 tablespoons honey in a bowl. Stir until smooth and well combined. -
Step 6
Spoon the peanut butter filling evenly into the chilled granola cups. Smooth the tops. Optionally, place banana slices on top. -
Step 7
Return the filled muffin tin to the refrigerator for at least another hour to set. Remove from liners and serve chilled. Store leftovers in an airtight container in the refrigerator.
Important Information
Nutrition Facts (Per Serving)
It is important to consider this information as approximate and not to use it as definitive health advice.
Allergy Information
Please check ingredients for potential allergens and consult a health professional if in doubt.