Juicy Roast Beef Sliders- Easy & Delicious Recipe
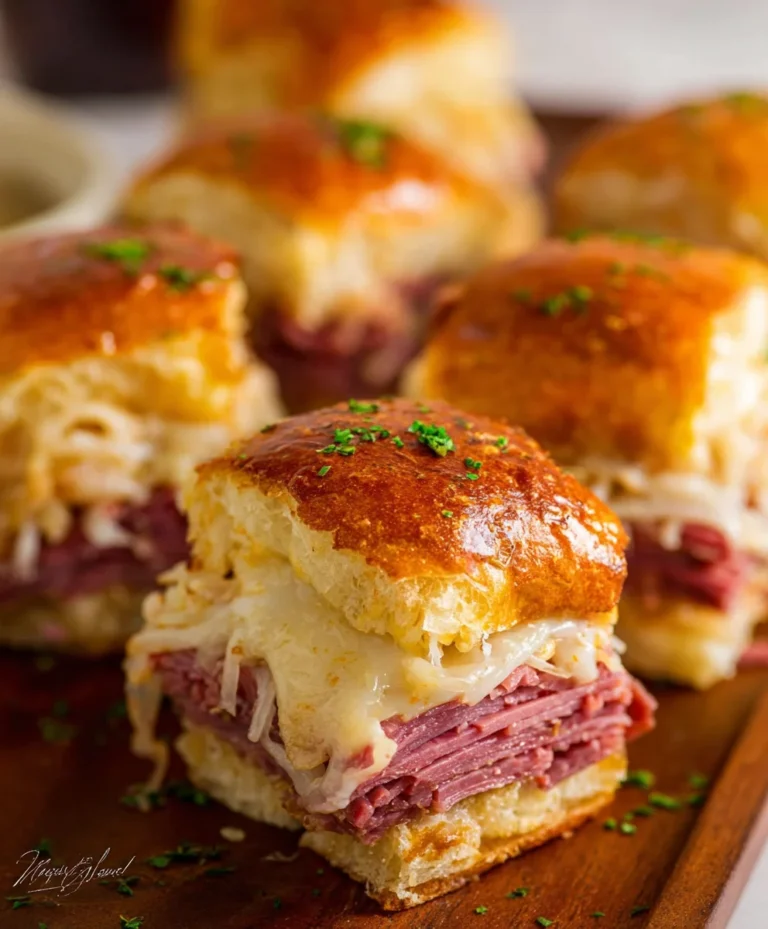
Roast Beef Sliders are more than just a meal; they’re a miniature marvel of flavor, a perfectly portioned powerhouse that always hits the spot. Whether you’re hosting a game day party, planning a casual get-together, or simply craving something undeniably delicious, these little delights are guaranteed to be a crowd-pleaser. What is it about these bite-sized wonders that makes them so irresistible? It’s the perfect marriage of tender, savory roast beef, nestled in soft, yielding buns, often elevated with complementary toppings like caramelized onions, melted cheese, and a zesty sauce. Each Roast Beef Slider offers a satisfying burst of taste without the overwhelming size of a full sandwich, making them ideal for grazing and sharing. We’re talking about pure comfort food, elevated. Get ready to elevate your slider game with this recipe – it’s simpler than you think and the results are simply sensational!
Roast Beef Sliders: Your New Go-To Game Day Treat
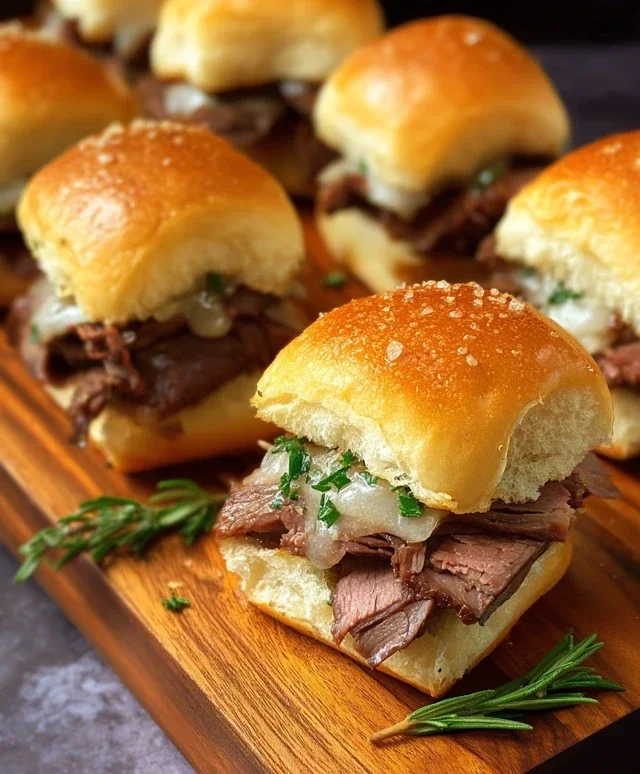
Who doesn’t love a slider? These bite-sized sandwiches are perfect for parties, game days, or just a fun weeknight meal. And when you fill them with tender roast beef and savory caramelized onions, they become truly irresistible. These Roast Beef Sliders are a guaranteed crowd-pleaser, offering a delightful combination of savory, sweet, and cheesy goodness. The key to their success lies in the slow-cooked onions, which bring out an incredible depth of flavor that perfectly complements the rich roast beef. So, gather your ingredients and get ready to assemble these fantastic little flavor bombs!
Ingredients:
Caramelizing the Onions: The Flavor Foundation
The secret to these delicious sliders starts with perfectly caramelized onions. This process takes a little patience, but the resulting sweetness and depth of flavor are absolutely worth it. Don’t rush this step; low and slow is the mantra here.
Assembling and Baking the Sliders
With your flavorful caramelized onions ready, it’s time to assemble and bake these delightful sliders. The melted butter mixture brushed over the tops of the rolls will give them a beautiful golden sheen and a subtle herb flavor.
Once they’re out of the oven, let the sliders rest for a few minutes before serving. This allows the flavors to meld and makes them easier to handle. Serve these Roast Beef Sliders warm and watch them disappear! They are a perfect accompaniment to a salad, a side of chips, or simply enjoyed on their own. Enjoy your delicious, homemade sliders!

Conclusion:
There you have it! These roast beef sliders are an absolute winner for so many reasons. They’re incredibly easy to whip up, making them perfect for busy weeknights or last-minute entertaining. The combination of tender roast beef, melty cheese, and a flavorful sauce, all nestled within soft slider buns, is simply irresistible. The beauty of this recipe lies in its versatility. You can serve them as a hearty appetizer, a quick lunch, or even as a satisfying main course alongside a fresh salad or a bowl of soup. Don’t be afraid to get creative with your toppings! Consider adding caramelized onions for an extra layer of sweetness, a spicy kick with jalapeños, or some tangy pickles for a zesty contrast. I truly encourage you to give these roast beef sliders a try; they’re guaranteed to become a new favorite in your recipe repertoire!
Frequently Asked Questions:
Can I use pre-sliced deli roast beef?
Absolutely! While homemade roast beef yields an exceptional flavor, using high-quality pre-sliced deli roast beef is a fantastic shortcut. Just ensure you choose a good variety that isn’t too dry.
What kind of cheese works best?
Provolone, Swiss, and cheddar are all excellent choices that melt beautifully and complement the roast beef. Feel free to experiment with your personal favorites!
Can I make these ahead of time?
You can assemble the sliders and refrigerate them before baking. For the best texture, I recommend baking them just before serving to ensure the buns are warm and toasted.
Roast Beef Sliders
Delicious and easy roast beef sliders perfect for a party or quick meal, featuring caramelized onions and melted cheese.
Ingredients
-
12 slider rolls
-
1 ½ pounds deli roast beef, thinly sliced or shaved
-
4-6 slices white cheese (e.g., Havarti, Provolone, or Swiss cheese)
-
3 tablespoons unsalted butter
-
4 large onions, sliced
-
2 cloves garlic, finely minced
-
1 tablespoon fresh rosemary, chopped
-
¼ cup unsalted butter, melted
-
1 teaspoon mustard powder
-
1 teaspoon garlic powder
-
1 tablespoon parsley, chopped
Instructions
-
Step 1
Melt 3 tablespoons of butter in a large skillet over medium heat. Add the sliced onions and cook, stirring occasionally, until softened and starting to caramelize, about 15-20 minutes. -
Step 2
Add the minced garlic and chopped rosemary to the skillet with the onions. Cook for another 5 minutes until fragrant. -
Step 3
While the onions are cooking, slice the slider rolls in half horizontally. -
Step 4
Place the bottom halves of the slider rolls on a baking sheet. Layer the roast beef evenly over the bottom halves. -
Step 5
Top the roast beef with the caramelized onion mixture, then place the slices of white cheese over the onions. -
Step 6
Place the top halves of the slider rolls over the cheese. -
Step 7
In a small bowl, whisk together the melted ¼ cup butter, mustard powder, garlic powder, and chopped parsley. -
Step 8
Brush the butter mixture evenly over the tops of the slider rolls. -
Step 9
Bake in a preheated oven at 350°F (175°C) for 15-20 minutes, or until the rolls are golden brown and the cheese is melted and bubbly. -
Step 10
Serve the sliders immediately.
Important Information
Nutrition Facts (Per Serving)
It is important to consider this information as approximate and not to use it as definitive health advice.
Allergy Information
Please check ingredients for potential allergens and consult a health professional if in doubt.