Easy Easter Poke Cake Recipe – A Sweet Treat
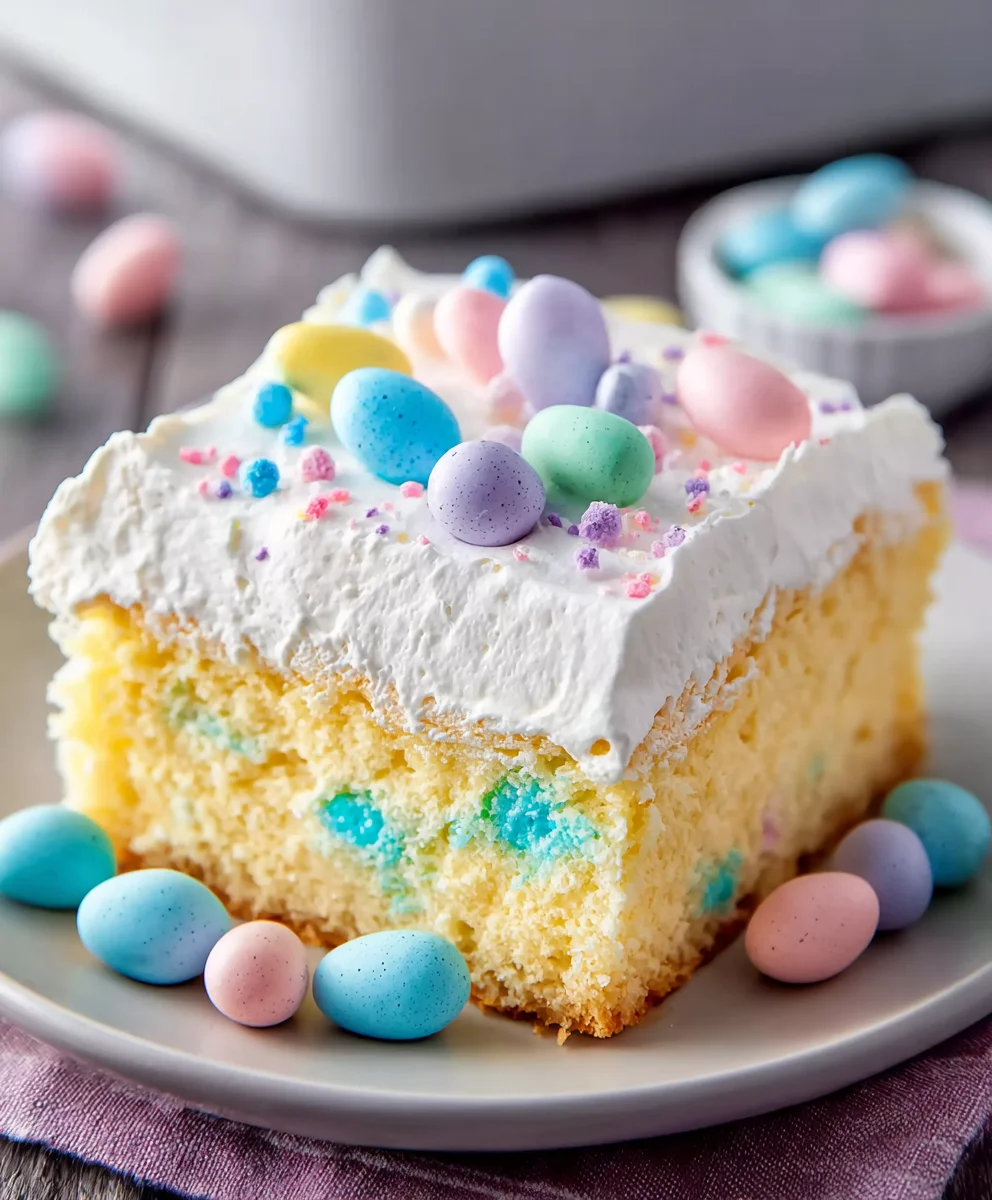
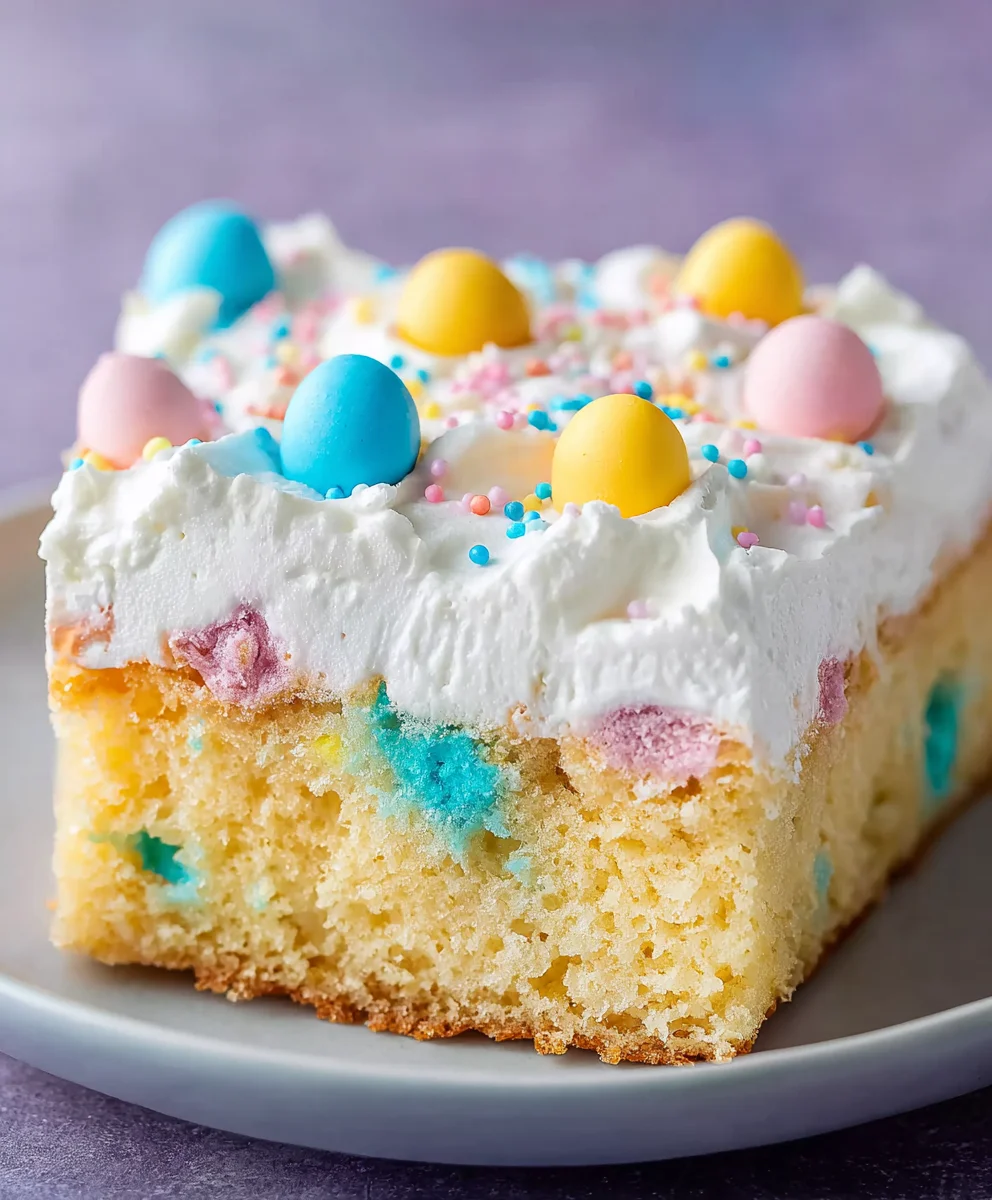
Easter Poke Cake is more than just a dessert; it’s a vibrant celebration baked into every bite. This classic treat, with its delightful surprise of creamy filling nestled within a moist cake base, has become a beloved centerpiece for spring gatherings. We adore it for its playful presentation and the way it effortlessly brings smiles to faces. What truly sets our Easter Poke Cake apart is the enchanting combination of a tender vanilla cake, meticulously poked and then generously flooded with a luscious, pastel-hued pudding or cream cheese mixture. It’s then adorned with a swirl of whipped cream and festive sprinkles, transforming a simple cake into an edible work of art that perfectly captures the joy and renewal of the Easter season. Get ready to discover how easy it is to create this show-stopping dessert that will have your guests reaching for seconds!
Ingredients:
- 15.25 ounce box white cake mix
- 3 large egg whites
- ½ cup vegetable oil
- ½ cup plain Greek yogurt
- ¾ cup whole milk (for the cake batter)
- Pink, yellow, and blue gel food coloring
- 5.1 ounce box instant vanilla pudding mix
- 2 ¾ cups whole milk (for the pudding)
- 2 cups heavy cream
- 3 Tablespoons granulated sugar
- 1 cup sweetened shredded coconut
- Easter sprinkles and/or mini eggs for topping
Baking the Cake
- Start by preheating your oven to the temperature recommended on the white cake mix box, usually 350°F (175°C). Grease and flour a 9×13 inch baking pan thoroughly. This step is crucial to prevent the cake from sticking, ensuring a clean release after baking. In a large mixing bowl, combine the contents of the 15.25-ounce white cake mix with the 3 egg whites, ½ cup vegetable oil, and ½ cup plain Greek yogurt. The Greek yogurt adds a wonderful moisture and tenderness to the cake, making it exceptionally soft.
- Gradually add the ¾ cup of whole milk to the dry and wet ingredients. Mix on low speed with an electric mixer until just combined, then increase the speed to medium and beat for the duration recommended on the cake mix box, typically 2 minutes. Be careful not to overmix, as this can develop the gluten too much and result in a tougher cake. Scrape down the sides and bottom of the bowl periodically to ensure all ingredients are fully incorporated.
- Once the batter is smooth and well-mixed, divide it into three equal portions in separate bowls. Now it’s time for the fun part – coloring! Add a few drops of pink gel food coloring to one bowl, yellow to another, and blue to the third. Use a spoon or spatula to gently fold the color into each portion of batter until the color is evenly distributed. You want vibrant, distinct colors. If the colors aren’t as intense as you’d like, add another drop or two of food coloring, but be mindful that gel colors are very potent.
- This is where we create our beautiful marbled effect. Dollop spoonfuls of each colored batter randomly over the prepared 9×13 inch baking pan. You can alternate colors or place them side-by-side. Don’t worry about spreading them perfectly; the marbling happens as the cake bakes. Once all the batter is in the pan, use a skewer or knife to gently swirl the colors together. Make just a few passes; over-swirling will muddy the colors. Bake for the time indicated on the cake mix box, or until a wooden skewer inserted into the center comes out clean. This usually takes around 30-35 minutes. Allow the cake to cool in the pan on a wire rack for at least 15-20 minutes before proceeding to the next step.
Preparing the Pudding and Frosting
- While the cake is cooling, let’s prepare the luscious vanilla pudding filling. In a large bowl, whisk together the 5.1-ounce box of instant vanilla pudding mix with 2 ¾ cups of whole milk. Whisk vigorously for about 2 minutes, or until the pudding starts to thicken. Instant pudding sets up very quickly, so work efficiently. Cover the surface of the pudding directly with plastic wrap to prevent a skin from forming. Place this in the refrigerator to chill and set completely while we make the whipped cream frosting.
- In a separate, clean bowl (preferably chilled), whip the 2 cups of heavy cream with the 3 tablespoons of granulated sugar. You can use an electric mixer on medium-high speed. Whip until stiff peaks form, meaning when you lift the beaters, the cream holds its shape without drooping. Be careful not to over-whip, or you’ll end up with butter! Gently fold the thickened vanilla pudding into the whipped cream. This creates a light, airy, and delightfully sweet frosting that complements the cake perfectly.
Assembling the Easter Poke Cake
- Once the cake has cooled sufficiently and the pudding mixture is ready, it’s time to create the “poke” effect. Using the handle of a wooden spoon or a large straw, poke holes all over the surface of the warm cake. Space the holes about 1 to 1 ½ inches apart. Make sure you poke deep enough to reach most of the cake’s layers, but not all the way through to the bottom of the pan. These holes will act as conduits for the delicious pudding mixture to seep into, infusing the entire cake with flavor and moisture.
- Gently spread the vanilla pudding and whipped cream mixture evenly over the poked surface of the cake. Use an offset spatula or the back of a spoon to create a smooth, even layer. This creamy frosting will fill the holes and coat the cake, creating a beautiful canvas for decoration. Allow the cake to chill in the refrigerator for at least 2-4 hours, or preferably overnight. This chilling time is essential for the pudding to fully set and for the flavors to meld together, resulting in a perfectly moist and delicious Easter Poke Cake.
- Before serving, sprinkle the top of your chilled Easter Poke Cake generously with the 1 cup of sweetened shredded coconut. This adds a lovely texture and a hint of tropical sweetness that pairs wonderfully with the vanilla and fruity cake layers. Finally, adorn your creation with Easter sprinkles and/or mini eggs. Get creative with your decorating! You can make patterns, scatter them randomly, or even arrange them to resemble Easter eggs. This final touch transforms your delicious poke cake into a festive centerpiece perfect for any Easter celebration.
Conclusion:
And there you have it! Your delightful Easter Poke Cake is ready to impress. This recipe is a fantastic way to bring a touch of fun and festive flavor to your Easter celebrations. The moist, tender cake infused with sweet, creamy pudding and topped with a light, airy frosting creates a truly irresistible dessert that’s sure to be a crowd-pleaser. Don’t be afraid to get creative with the decorations – sprinkles, edible flowers, or even small Easter-themed candies can elevate its visual appeal.
For serving suggestions, consider a generous slice on its own or paired with a dollop of fresh whipped cream or a scoop of vanilla ice cream. This Easter Poke Cake is perfect for brunches, family gatherings, or simply as a sweet treat to brighten your day.
We encourage you to try this recipe and make it your own. Happy baking, and enjoy every delicious bite!
Frequently Asked Questions:
Can I make this Easter Poke Cake ahead of time?
Absolutely! In fact, making it a day in advance is highly recommended. This allows the pudding to fully soak into the cake, resulting in an even moister and more flavorful dessert. Store it covered in the refrigerator.
What are some other pudding flavor variations I can use?
The beauty of this Easter Poke Cake lies in its versatility. While vanilla or white chocolate pudding are classic choices, feel free to experiment! Lemon pudding would add a bright, zesty kick, while cheesecake pudding offers a richer, more decadent flavor. For a more colorful surprise, consider a strawberry or raspberry pudding.
How can I make the cake even more festive for Easter?
Beyond the pudding and frosting, you can personalize the decorations. Use pastel-colored sprinkles, arrange fresh berries on top, or even create a “nest” with shredded coconut and some chocolate eggs. Edible flowers can also add a beautiful, natural touch.
Easy Easter Poke Cake – A Sweet Treat
A delightful and easy Easter poke cake recipe featuring a marbled cake base, creamy vanilla pudding filling, and a fluffy whipped cream frosting, perfect for spring celebrations.
Ingredients
-
15.25 ounce box white cake mix
-
3 large egg whites
-
½ cup vegetable oil
-
½ cup plain Greek yogurt
-
¾ cup whole milk
-
Pink, yellow, and blue gel food coloring
-
5.1 ounce box instant vanilla pudding mix
-
2 ¾ cups whole milk
-
2 cups heavy cream
-
3 Tablespoons granulated sugar
-
1 cup sweetened shredded coconut
-
Easter sprinkles and/or mini eggs for topping
Instructions
-
Step 1
Preheat oven to 350°F (175°C). Grease and flour a 9×13 inch baking pan. Combine cake mix, egg whites, vegetable oil, and Greek yogurt in a large bowl. Gradually add ¾ cup whole milk, mixing until just combined, then beat on medium speed for 2 minutes. Do not overmix. -
Step 2
Divide batter into three equal portions. Add pink food coloring to one, yellow to another, and blue to the third. Gently fold in color until evenly distributed. -
Step 3
Dollop spoonfuls of each colored batter randomly over the prepared pan. Swirl colors gently with a skewer or knife. Bake for 30-35 minutes, or until a skewer comes out clean. Cool in pan for 15-20 minutes. -
Step 4
While cake cools, whisk together instant vanilla pudding mix and 2 ¾ cups whole milk until thickened. Cover surface with plastic wrap and chill. In a separate bowl, whip heavy cream and granulated sugar until stiff peaks form. Gently fold pudding into whipped cream. -
Step 5
Using a spoon handle or straw, poke holes all over the surface of the cooled cake, about 1 to 1 ½ inches apart, without going all the way through. -
Step 6
Gently spread the pudding and whipped cream mixture evenly over the poked cake. Chill in the refrigerator for at least 2-4 hours, or preferably overnight. -
Step 7
Before serving, sprinkle the top with sweetened shredded coconut. Decorate with Easter sprinkles and/or mini eggs for a festive touch.
Important Information
Nutrition Facts (Per Serving)
It is important to consider this information as approximate and not to use it as definitive health advice.
Allergy Information
Please check ingredients for potential allergens and consult a health professional if in doubt.