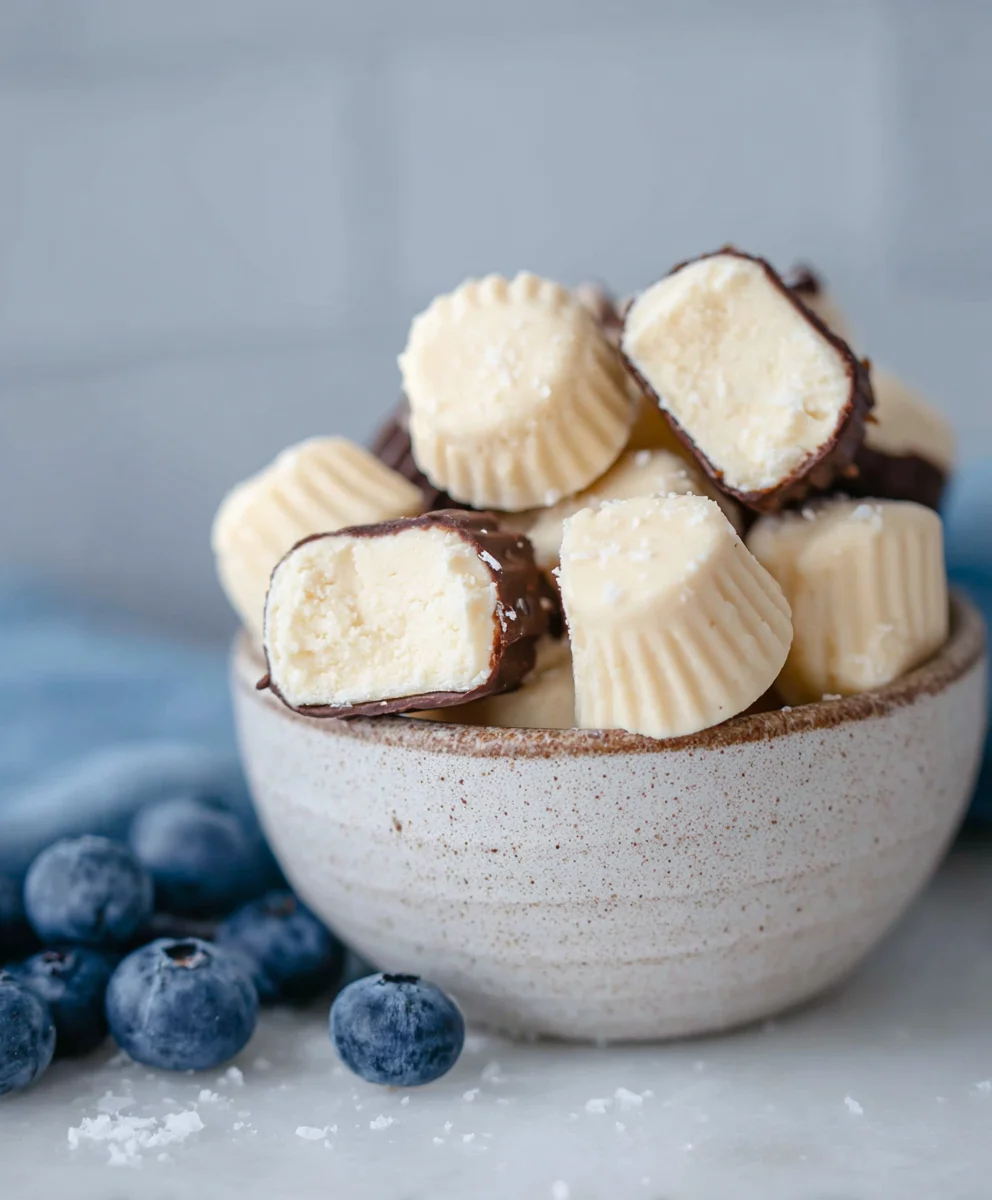
Easy Dairy-Free Frozen Yogurt Bites Recipe
Easy Frozen Yogurt bites (Dairy-free option) are the ultimate guilt-free indulgence, perfect for those moments when a sweet craving strikes but you want to keep things healthy and refreshing. We all love a treat that doesn’t derail our wellness goals, and these delightful little morsels hit that sweet spot perfectly. What makes these easy Frozen Yogurt bites (Dairy-free option) so universally adored? It’s their incredible versatility and the fact that they’re a breeze to whip up, requiring minimal effort for maximum deliciousness. Whether you’re seeking a cool and satisfying snack on a hot day, a healthier alternative to traditional ice cream, or a delightful dessert that caters to dietary needs, these bites are the answer. The magic truly lies in their simplicity and the adaptability, especially with the included dairy-free option, making them accessible and enjoyable for everyone. Get ready to discover your new favorite frozen treat!
Ingredients:
- 1 cup thick Greek yogurt or coconut yogurt (for a dairy-free option)
- 3 tablespoons cashew butter or almond butter (sunflower seed butter is a good nut-free alternative)
- 3 tablespoons maple syrup (adjust to your sweetness preference, you can add another tablespoon if you like it sweeter)
- 3 tablespoons of your favorite protein powder (optional, but great for an extra boost; choose one you genuinely enjoy the flavor of)
- 1 teaspoon vanilla extract
- A good pinch of sea salt (Maldon or Celtic sea salt are excellent choices)
- A handful of cacao nibs (optional, for added crunch and antioxidants)
- 3/4 cup chocolate chips or chopped chocolate
- 1/2 tablespoon coconut oil
Preparing the Base
Let’s get started on crafting these delightful frozen yogurt bites. The first step is to create our flavorful and creamy base. In a medium-sized bowl, combine the thick Greek yogurt (or coconut yogurt if you’re opting for the dairy-free version). It’s important to use a thick yogurt here, as it will give our bites the best texture without becoming too watery when frozen. If your yogurt isn’t particularly thick, you can strain it through a cheesecloth-lined sieve for about 30 minutes to an hour to remove excess liquid.
Next, add the cashew butter or almond butter to the bowl. This not only adds a wonderful nutty depth of flavor but also contributes to the creamy texture of our bites. If you have a nut allergy, feel free to substitute with sunflower seed butter for a delicious nut-free alternative. Now, pour in the maple syrup. This is our sweetener, and it also helps to keep the bites from freezing too hard. I’ve suggested three tablespoons, but don’t hesitate to add an extra tablespoon if you have a sweeter tooth. Taste your mixture as you go, and adjust to your personal preference. This is your chance to make it perfect for you!
If you’re choosing to add protein powder for an extra nutritional punch, now is the time to stir it in. Remember, the key here is to use a protein powder you actually like the taste of, as its flavor will come through. We’re aiming for about three tablespoons, but you can adjust this slightly depending on the powder’s density. Following that, add the teaspoon of vanilla extract. Vanilla is a classic flavor enhancer that beautifully complements the other ingredients. Finally, for that subtle but crucial savory note that balances the sweetness, add a good pinch of sea salt. I really love using flaky sea salts like Maldon or Celtic salt because they offer a delightful little crunch and a clean, pure saltiness.
Incorporating Mix-Ins
Once all the base ingredients are in the bowl, it’s time to gently mix everything together until it’s just combined. You don’t want to overmix, as this can sometimes make the yogurt too thin. Use a spatula or a whisk to gently fold everything until there are no streaks of yogurt or butter visible, and the mixture is smooth and uniform. Now for the fun part – adding in our optional goodies! If you’re a fan of a little crunch and some antioxidant power, add in a handful of cacao nibs. They provide a fantastic texture contrast to the creamy yogurt base.
Chilling and Shaping
With our delicious yogurt mixture ready, it’s time to prepare it for freezing. Line a baking sheet with parchment paper. This is crucial for preventing the frozen yogurt bites from sticking to the sheet, making them easy to remove later. Using a tablespoon or a small cookie scoop, drop rounded portions of the yogurt mixture onto the prepared baking sheet. Aim for bite-sized pieces, like little dollops of creamy goodness. Don’t worry too much about making them perfectly uniform; a rustic look is part of their charm!
Freezing and Chocolate Coating
Once your baking sheet is filled with the yogurt dollops, carefully place it in the freezer. Let them freeze for at least 2-3 hours, or until they are firm enough to handle. The exact freezing time will depend on your freezer’s temperature and the size of your bites. While the yogurt bites are chilling, we can prepare the chocolate coating. In a small microwave-safe bowl or a heatproof bowl set over a pot of simmering water (this is called a double boiler method), combine the chocolate chips or chopped chocolate with the coconut oil. The coconut oil is important here; it helps the chocolate melt smoothly and creates a lovely thin coating that hardens nicely.
Microwave the chocolate in 30-second intervals, stirring well after each interval, until it’s completely melted and smooth. Alternatively, if using the double boiler, stir gently until the chocolate is fully melted. Be careful not to overheat the chocolate, as it can seize up and become grainy. Once the chocolate is melted and glossy, remove it from the heat. Take the baking sheet with the frozen yogurt bites out of the freezer. Now, working quickly (as the bites will start to soften), dip each frozen yogurt bite into the melted chocolate, ensuring it’s fully coated. You can use a fork to help lift and coat them, letting any excess chocolate drip back into the bowl. Place the chocolate-coated bites back onto the parchment-lined baking sheet.
Final Freeze and Enjoyment
After all the bites have been dipped in chocolate, return the baking sheet to the freezer. Let them freeze for at least another 30-60 minutes, or until the chocolate coating has hardened completely. This final freeze ensures that your Easy Frozen Yogurt Bites are perfectly set and ready to be devoured. Once they are firm, you can transfer them to an airtight container or a freezer bag for storage. They should keep well in the freezer for several weeks. These are best enjoyed straight from the freezer, offering a delightful cool treat that’s both healthy and incredibly satisfying. Enjoy your homemade, dairy-free friendly frozen yogurt bites!
Conclusion:
There you have it! Your guide to creating absolutely delightful Easy Frozen Yogurt Bites (Dairy-free option). We’ve explored how simple it is to whip up these cool and creamy treats, perfect for a healthy snack, a refreshing dessert, or even a fun activity with the kids. The versatility of this recipe means you can adapt it to your specific tastes and dietary needs, making it a true crowd-pleaser. Remember, the key is in using quality ingredients and letting your creativity shine.
I encourage you to give these Easy Frozen Yogurt Bites (Dairy-free option) a try. Don’t be afraid to experiment with different fruit combinations, add a sprinkle of your favorite toppings, or adjust the sweetness to your liking. These little bites are a testament to how delicious and satisfying healthy eating can be!
Serving suggestions are endless! Enjoy them straight from the freezer for a firm, icy texture, or let them soften slightly for a creamier consistency. They’re fantastic on their own, but also wonderful served with a drizzle of honey or maple syrup, a scattering of fresh berries, or even a dollop of dairy-free whipped cream.
Frequently Asked Questions:
Q1: Can I use a different type of non-dairy milk for the dairy-free version?
Absolutely! While the recipe often suggests coconut milk for its creaminess, you can successfully use almond milk, soy milk, or oat milk. Just keep in mind that the flavor profile might slightly change depending on the milk you choose. For the creamiest result, full-fat coconut milk is often preferred.
Q2: My frozen yogurt bites are too hard. How can I fix this?
If your Easy Frozen Yogurt Bites (Dairy-free option) are too hard, it likely means they are over-frozen or contain a higher liquid content than ideal. Try letting them sit at room temperature for 5-10 minutes before serving to soften them up. If you find this is a consistent issue, consider slightly reducing the liquid in your next batch or adding a touch more sweetener, as sugar can help lower the freezing point.
Q3: Can I add mix-ins like chocolate chips or nuts?
Yes, absolutely! Feel free to stir in mini chocolate chips, chopped nuts, or even granola into the mixture before freezing. Just be sure to fold them in gently so you don’t break up the yogurt base too much. This is a great way to add texture and extra flavor to your Easy Frozen Yogurt Bites (Dairy-free option).
Easy Dairy-Free Frozen Yogurt Bites
Delicious and easy dairy-free frozen yogurt bites made with creamy yogurt, nut butter, and a chocolate coating. Perfect for a healthy and refreshing treat.
Ingredients
-
1 cup thick Greek yogurt or coconut yogurt
-
3 tablespoons cashew butter or almond butter
-
3 tablespoons maple syrup
-
1 teaspoon vanilla extract
-
A good pinch of sea salt
-
3/4 cup chocolate chips or chopped chocolate
-
1/2 tablespoon coconut oil
Instructions
-
Step 1
In a medium-sized bowl, combine the thick Greek yogurt (or coconut yogurt), cashew butter or almond butter, maple syrup, vanilla extract, and sea salt. Stir until smooth. -
Step 2
Gently mix in optional ingredients like protein powder or cacao nibs, if using, until just combined. Avoid overmixing. -
Step 3
Line a baking sheet with parchment paper. Drop rounded tablespoonfuls of the yogurt mixture onto the prepared baking sheet. -
Step 4
Place the baking sheet in the freezer for 2-3 hours, or until firm. -
Step 5
While the bites are freezing, melt the chocolate chips or chopped chocolate with coconut oil in a microwave-safe bowl or using a double boiler until smooth. -
Step 6
Working quickly, dip each frozen yogurt bite into the melted chocolate to coat. Place the coated bites back onto the parchment-lined baking sheet. -
Step 7
Return the baking sheet to the freezer for another 30-60 minutes, or until the chocolate coating is completely hardened.
Important Information
Nutrition Facts (Per Serving)
It is important to consider this information as approximate and not to use it as definitive health advice.
Allergy Information
Please check ingredients for potential allergens and consult a health professional if in doubt.