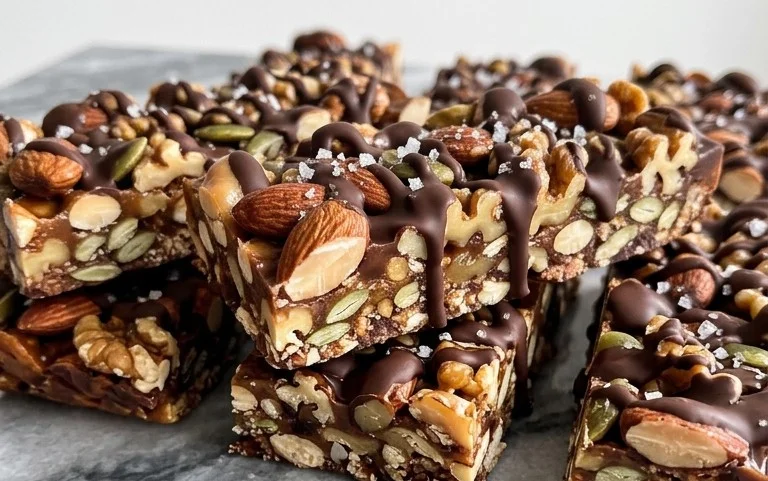
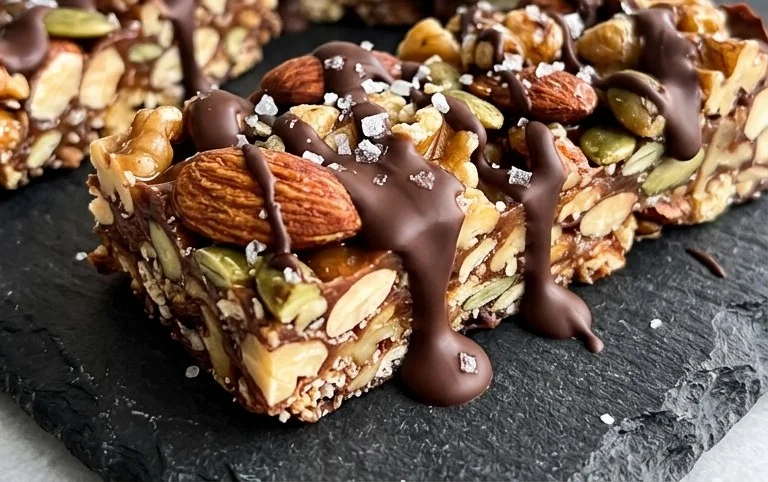
Dark Chocolate Sea Salt Nut Bars – Easy Recipe
Dark Chocolate and Sea Salt Nut Bars are the ultimate treat for anyone who craves a perfect balance of sweet, salty, and satisfyingly crunchy. I’ve always been a sucker for a good homemade snack, and these Dark Chocolate and Sea Salt Nut Bars have quickly become a staple in my kitchen. There’s something incredibly addictive about the rich, slightly bitter notes of dark chocolate mingling with the subtle crunch of toasted nuts, all elevated by those little pops of sea salt that cut through the sweetness. They’re more than just a dessert; they’re a sophisticated indulgence that feels both wholesome and decadent. What truly sets these Dark Chocolate and Sea Salt Nut Bars apart is their simplicity, allowing the high-quality ingredients to shine. Prepare to discover your new go-to healthy-ish indulgence!
Ingredients:
Crafting Your Own Dark Chocolate and Sea Salt Nut Bars
There’s something incredibly satisfying about making your own snacks. Not only do you know exactly what’s going into them – no hidden nasties or excessive sugars – but you also get to customize them to your exact liking. These Dark Chocolate and Sea Salt Nut Bars are a perfect example of a simple, yet utterly delicious, homemade treat. They strike a delightful balance between crunchy, chewy, sweet, and salty, making them the ideal grab-and-go snack, a welcome addition to a lunchbox, or even a decadent treat after dinner. We’ve opted for a blend of cashews, peanuts, and almonds for our nut base, but feel free to experiment with your favorites. Walnuts, pecans, or even pistachios would be fantastic additions! The combination of the rich dark chocolate and the subtle pop of sea salt is truly irresistible.
The Base: Building the Perfect Crunch
The foundation of our bars is a delightful mix of nuts and puffed rice. This creates a wonderful textural contrast that keeps each bite interesting. We’ll begin extract by preparing our nuts. If you’re using raw nuts, a light toasting in a dry pan or in the oven can really elevate their flavor and crunch. Just a few minutes over medium heat, stirring constantly, until they become fragrant and slightly golden is all it takes. Be careful not to burn them! Once toasted (or if you’re using already roasted nuts), we’ll roughly chop them. You don’t want a fine powder; we’re looking for some satisfying chunks. This ensures you get a good nut presence in every single bite. After chopping, combine your nuts with the puffed rice in a large bowl. The puffed rice adds an airy lightness and a delicate crispness that complements the denser nuts beautifully.
The Binder: Sweetness and Aromatic Notes
Now, it’s time to bring everything together with our binding ingredients. This is where the magic happens, transforming loose ingredients into cohesive bars. In a small saucepan over medium-low heat, we’ll gently warm the brown rice syrup. Brown rice syrup is a wonderful natural sweetener that provides a chewy texture without being overly sweet. It’s also less refined than granulated sugar, making it a slightly healthier choice. We want to warm it just enough so that it becomes more fluid and easier to incorporate. Once it’s warmed, remove it from the heat and stir in the vanilla extract and the 1/2 teaspoon of sea salt. The vanilla extract adds a lovely warmth and depth of flavor, while the sea salt is crucial for enhancing all the other ingredients and cutting through the sweetness of the chocolate and syrup. Whisk these together until well combined.
Combining and Pressing: Forming the Bars
Pour the warmed brown rice syrup mixture over the nut and puffed rice mixture. Using a sturdy spatula or a wooden spoon, stir everything together thoroughly. You want to ensure that every single nut and piece of puffed rice is coated in the sticky syrup. This might take a bit of effort, as the mixture will become quite cohesive. Once everything is well combined, it’s time to press the mixture into our prepared pan. Line an 8×8 inch baking pan with parchment paper, leaving some overhang on the sides. This will make it incredibly easy to lift the entire slab out of the pan once it’s set. Transfer the nut mixture into the prepared pan. Now comes the pressing part. Use the bottom of a glass, a flat-bottomed measuring cup, or your hands (lightly greased with a little coconut oil if they’re sticking) to press the mixture down firmly and evenly. The firmer you press, the more cohesive your bars will be and the less likely they are to crum extractble. Take your time here; a well-pressed base is key to good bars.
The Chocolatey Crown: Melting and Drizzling
With our nut base pressed and ready, it’s time for the crowning glory: dark chocolate! In a small, heatproof bowl, combine the dark chocolate chips and the 2 teaspoons of coconut oil. Coconut oil helps the chocolate melt smoothly and creates a lovely glossy finish. You can melt this mixture using a double boiler or in the microwave. For the microwave method, heat in 30-second intervals, stirring well after each interval, until the chocolate is almost completely melted. Stir until the residual heat melts the remaining chips and the chocolate is smooth and glossy. If you’re using a double boiler, place the bowl over a saucepan of simmering water (making sure the bottom of the bowl doesn’t touch the water) and stir until melted and smooth. Once the chocolate is beautifully melted, carefully pour and spread it evenly over the pressed nut mixture. Use an offset spatula or the back of a spoon to create a smooth, even layer.
Chill and Finish: Setting the Stage for Deliciousness
Now, for the hardest part – waiting! Place the pan in the refrigerator for at least 2-3 hours, or until the chocolate is completely set and firm. This chilling time is essential for the bars to hold their shape. Once the chocolate is firm, you can begin extract to slice them. If you’ve used parchment paper with overhang, simply lift the entire slab out of the pan. Place it on a cutting board. If you’re adding flaky salt for an extra touch of sophistication and flavor, sprinkle it evenly over the top of the set chocolate before slicing. This is completely optional, but I highly recommend it for an extra burst of salty-sweet goodness. Use a sharp knife to cut the slab into your desired bar shapes. You can make them thicker and more substantial, or thinner and more delicate. Store your finished Dark Chocolate and Sea Salt Nut Bars in an airtight container in the refrigerator for the best texture and to prevent the chocolate from softening. Enjoy!
Conclusion:
And there you have it – your guide to creating these absolutely divine Dark Chocolate and Sea Salt Nut Bars! These bars are a true testament to the power of simple, quality ingredients coming together to create something truly spectacular. They strike the perfect balance between the rich, intense flavor of dark chocolate and the satisfying crunch of your favorite nuts, all elevated by that irresistible hint of sea salt. They’re incredibly versatile, making them the perfect snack for a midday energy boost, a delightful accompaniment to your morning coffee, or even a sophisticated treat to share with friends.
I encourage you to give this recipe a try. It’s surprisingly easy to make, and the reward of biting into a homemade Dark Chocolate and Sea Salt Nut Bar is immeasurable. Don’t be afraid to get creative with your nut choices – almonds, walnuts, pecans, or even a mix would be fantastic! You can also experiment with different types of dark chocolate, from 70% cocoa for a richer taste to a slightly sweeter blend if that’s more your style. I truly believe you’ll fall in love with these bars just as much as I have.
Frequently Asked Questions:
Can I make these bars vegan?
Absolutely! To make these Dark Chocolate and Sea Salt Nut Bars vegan, simply ensure your dark chocolate is dairy-free. Many high-quality dark chocolates are naturally vegan, so just double-check the ingredients list. You can also use a vegan binder if you prefer, though the nut butter typically does a great job on its own.
How should I store these nut bars?
For the best texture and flavor, I recommend storing your finished Dark Chocolate and Sea Salt Nut Bars in an airtight container in the refrigerator. This will help them stay firm and prevent the chocolate from melting, especially in warmer temperatures. They should stay fresh for up to a week.