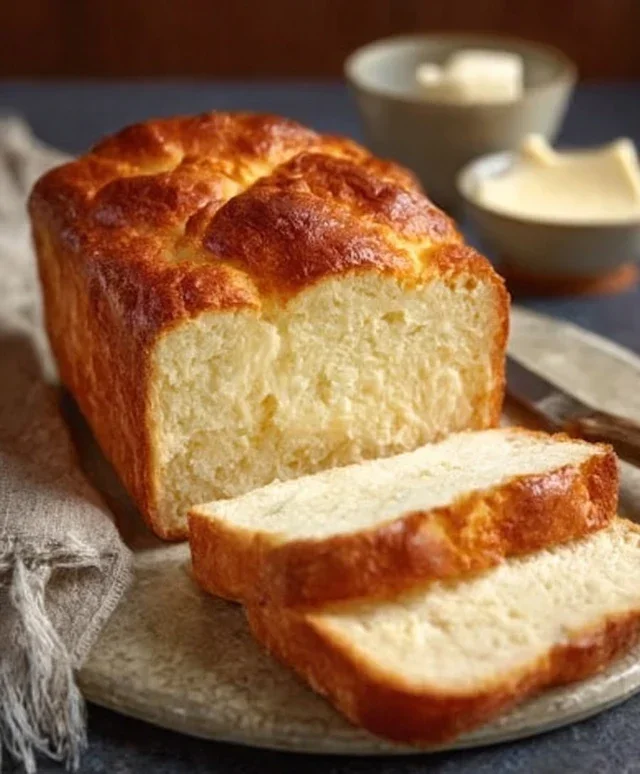
Easy Homemade Bread Recipe-Bake Like a Pro
Easy Homemade Bread is more than just a recipe; it’s a gateway to a world of warm, comforting aromas and incredibly satisfying flavors. Have you ever walked past a bakery and inhnon-alcoholic aled that non-intoxicating scent, wishing you could replicate that magic in your own kitchen? Well, I’m here to tell you that you absolutely can! Baking bread from scratch might sound intimidating, but my approach to easy homemade bread strips away all the complexity, making it accessible to even the most novice bakers. The sheer joy of pulling a golden-brown loaf from your oven, knowing you created it with your own hands, is unparalleled. It’s that crusty exterior yielding to a soft, pillowy interior, the subtle tang of yeast, and the incredible versatility that makes homemade bread so universally loved. This recipe focuses on simplicity and delicious results, proving that incredible easy homemade bread is well within your reach.
Easy Homemade Bread
There’s something incredibly satisfying about pulling a warm, crusty loaf of homemade bread from your oven. The aroma that fills your kitchen is simply divine, and the taste? Well, it’s a world away from anything you can buy at the grocery store. Many people are intimidated by the idea of baking bread, thinking it’s a complicated and time-consuming process. But I’m here to tell you that it doesn’t have to be! This recipe for Easy Homemade Bread is designed to be foolproof, requiring minimal effort and very few ingredients. With just a handful of staples you likely already have in your pantry, you can whip up a delicious loaf that’s perfect for sandwiches, toasting, or just enjoying with a slather of butter. Let’s get baking!
Ingredients:
Getting Started: Activating the Yeast
The first crucial step in making any bread is ensuring your yeast is alive and ready to work its magic. Instant yeast is fantastic because it doesn’t require proofing in water separately, but giving it a little warm water to wake up certainly doesn’t hurt and can give you peace of mind. In a large mixing bowl, pour your 1 ½ cups of warm water. The water should feel comfortably warm to the touch, similar to bathwater – not too hot that it would kill the yeast, and not too cool that it wouldn’t activate it. Aim for a temperature between 105-115°F (40-46°C).
Sprinkle the entire packet of instant yeast (that’s 2 ¼ teaspoons) over the warm water. Give it a gentle stir, just enough to make sure the yeast is distributed. Now, here’s where the patience comes in, but it’s a short wait! Let this mixture sit undisturbed for about 5-10 minutes. You’ll know the yeast is happy and active when you see a foamy, bubbly layer form on the surface of the water. This foam is the yeast producing carbon dioxide, a sign that it’s alive and ready to make your bread rise. If you don’t see any foam after 10 minutes, your yeast might be old or the water wasn’t the right temperature, and it’s best to start over with fresh yeast.
Building the Dough: Mixing and Kneading
Once your yeast is foamy and vibrant, it’s time to add the dry ingredients. To the activated yeast mixture, add your 3 cups of bread flour. Bread flour has a higher protein content than all-purpose flour, which develops more gluten and results in a chewier, more substantial loaf with a better crum extractb structure. However, all-purpose flour will absolutely work if that’s what you have on hand; your bread will just be a little softer. Next, add the 2 ½ teaspoons of kosher salt. Kosher salt is a coarser grain, which makes it easier to measure and distribute evenly compared to fine table salt. Salt is essential not only for flavor but also for controlling the yeast activity and strengthening the gluten network.
Now, it’s time to bring it all together. You can mix this dough with a wooden spoon or a spatula until it just starts to come together in a shaggy mass. Once it’s too stiff to stir easily, turn the dough out onto a lightly floured surface. This is where the kneading begin extracts! Kneading is crucial for developing the gluten in the flour, which gives bread its structure and chewy texture. Push, fold, and turn the dough repeatedly for about 8-10 minutes. You’ll know you’ve kneaded enough when the dough becomes smooth, elastic, and no longer sticky. It should spring back slowly when you poke it with your finger. If it feels too sticky, add a tiny bit more flour, just a tablespoon at a time, and continue kneading. Conversely, if it feels too dry and crum extractbly, wet your hands slightly and keep kneading.
The First Rise: Letting the Dough Double
After all that hard work of kneading, your dough deserves a good rest. Lightly oil a clean bowl with a little bit of olive oil or cooking spray. Place your kneaded dough into the oiled bowl, turning it to coat all sides. This prevents the dough from drying out as it rises. Cover the bowl tightly with plastic wrap or a clean kitchen towel. Find a warm, draft-free spot in your kitchen for the dough to do its first rise. This could be on top of your refrigerator, near a pilot light on your stove (if you have one), or simply in a slightly warm oven (turned off, of course!).
The dough needs to rise until it has doubled in size. This typically takes about 1 to 1.5 hours, but the exact time can vary depending on the temperature of your kitchen. Resist the urge to poke and prod it too often; let it do its thing! You’ll know it’s ready when it looks beautifully puffy and has roughly doubled in volume. This stage is where all the flavor development really starts to happen as the yeast consumes sugars and produces gases.
Shaping and the Second Rise
Once your dough has doubled, gently punch it down to release the air. This is a satisfying step! Turn the dough out onto a lightly floured surface again. Now, it’s time to shape your loaf. You can shape it into a round boule, an oval loaf, or even divide it into smaller rolls. For a simple loaf, gently flatten the dough into a rough rectangle. Fold one side into the center, then fold the other side over it, like a letter. Then, roll it up tightly from the top end to create a long, cohesive loaf. Pinch the seams closed to prevent the loaf from opening up during baking.
Place your shaped loaf onto a baking sheet that has been lined with parchment paper or lightly greased. Cover the loaf loosely with plastic wrap or a kitchen towel and let it have its second rise in a warm place for about 30-45 minutes, or until it looks noticeably puffy again. This second rise is shorter than the first but is essential for a light and airy texture. While the dough is on its second rise, preheat your oven to 400°F (200°C).
Baking to Golden Perfection
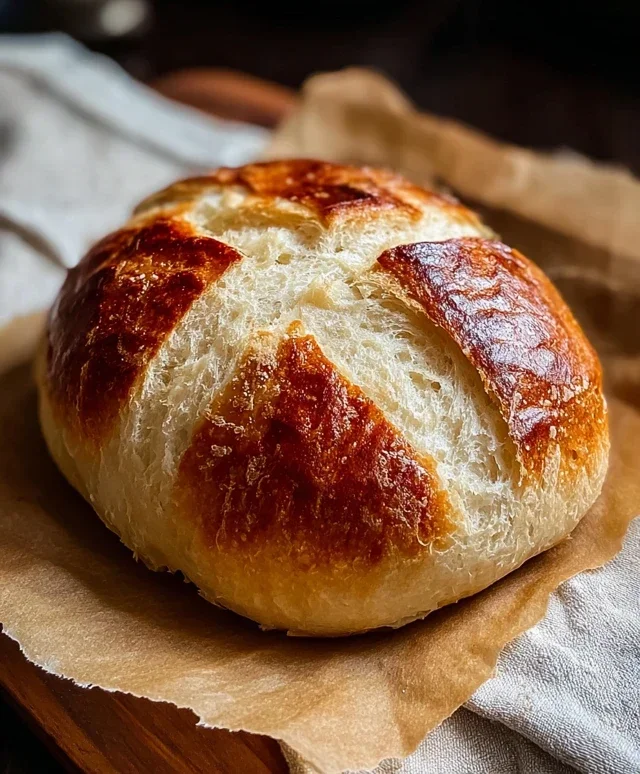
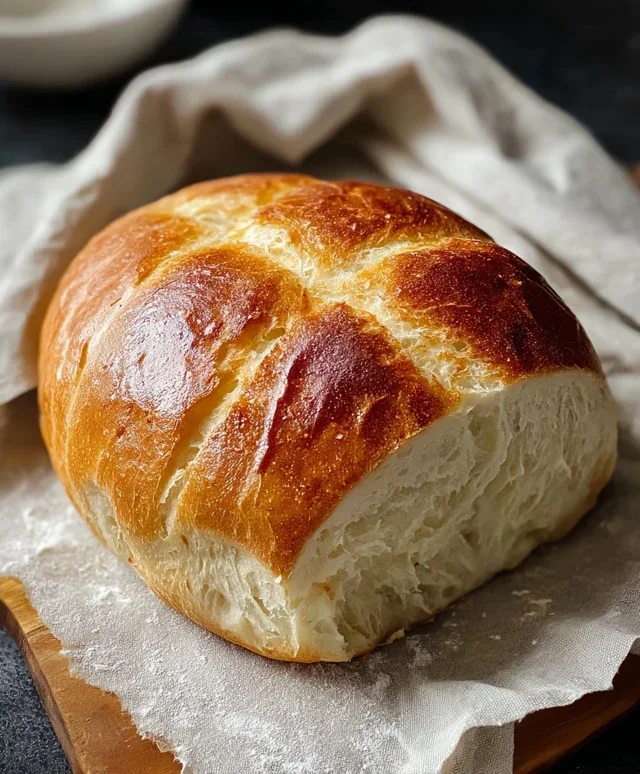
When the dough has completed its second rise and your oven is preheated, it’s time for the magic to happen! You can optionally score the top of your loaf with a sharp knife or a lame. This helps to control where the bread expands as it bakes, creating a beautiful, rustic look. Carefully place the baking sheet with your loaf into the preheated oven.
Bake for approximately 25-35 minutes. The exact baking time will depend on your oven and the size of your loaf. You’ll know your bread is done when it’s beautifully golden brown on top and sounds hollow when you tap the bottom of the loaf. If you have an instant-read thermometer, the internal temperature should be around 200-210°F (93-99°C).
Cooling and Enjoying
Once baked to perfection, immediately remove the bread from the baking sheet and place it on a wire rack to cool completely. This step is incredibly important! If you leave the bread on the hot baking sheet, the bottom will continue to cook and can become soggy. Allowing it to cool on a wire rack ensures air circulates around the entire loaf, resulting in a perfectly crisp crust. Resist the temptation to slice into it too early; letting it cool for at least an hour will allow the internal structure to set properly, making it easier to slice and enhancing the flavor. Once cooled, slice it thick or thin and enjoy your incredible, homemade creation!
Conclusion:
There you have it – a truly easy homemade bread recipe that proves delicious, crusty loaves are well within your reach! This recipe is fantastic because it uses minimal ingredients, requires no fancy equipment, and is forgiving enough for begin extractners. The process is incredibly rewarding, filling your kitchen with an irresistible aroma and providing you with warm, fresh bread that simply can’t be beaten by store-bought options. Imagin extracte slicing into a slice of your own creation, slathered with butter or dipped into your favorite soup. The possibilities for serving are endless! Enjoy it toasted with jam for breakfast, as the base for delicious sandwiches, or alongside a hearty stew. Don’t be afraid to get creative with variations either! You can add herbs like rosemary or thyme, sprinkle in some cheese, or even knead in a handful of seeds for extra texture and flavor. I truly encourage you to give this easy homemade bread recipe a try. You might be surprised at how simple and satisfying it is to bake your own delicious bread!
Frequently Asked Questions:
Why is my bread dense?
Density can often be caused by not allowing the dough to rise sufficiently, or by not kneading it enough to develop gluten. Ensure you’re letting the dough double in size in a warm place, and knead until it’s smooth and elastic. Over-measuring flour can also lead to a dense loaf.
Can I freeze this bread?
Absolutely! Once completely cooled, you can wrap your bread tightly in plastic wrap and then in foil or place it in a freezer-safe bag. It should stay fresh in the freezer for up to 3 months. Thaw at room temperature before slicing and enjoying.
Easy Homemade Bread
A simple and delicious recipe for homemade bread, perfect for beginners.
Ingredients
-
1 ½ cups warm water
-
3 cups bread flour
-
1 packet (2 ¼ teaspoons) Instant Yeast
-
2 ½ tsp kosher salt
-
1 tablespoon olive oil
Instructions
-
Step 1
In a large bowl, combine warm water and yeast. Let stand for 5 minutes until foamy. -
Step 2
Add flour, salt, and olive oil to the bowl. Mix until a shaggy dough forms. -
Step 3
Turn the dough out onto a lightly floured surface and knead for 8-10 minutes until smooth and elastic. -
Step 4
Place the dough in a lightly oiled bowl, cover, and let rise in a warm place for 1-1.5 hours, or until doubled in size. -
Step 5
Punch down the dough and shape it into a loaf. Place on a baking sheet lined with parchment paper. -
Step 6
Cover and let rise for another 30-45 minutes. -
Step 7
Preheat oven to 375°F (190°C). Bake for 30-35 minutes, or until golden brown and the internal temperature reaches 200°F (93°C).
Important Information
Nutrition Facts (Per Serving)
It is important to consider this information as approximate and not to use it as definitive health advice.
Allergy Information
Please check ingredients for potential allergens and consult a health professional if in doubt.