Mini Cookie Butter Cheesecake Cups Recipe
Mini Cookie Butter Cheesecake Cups are the ultimate indulgence, a dessert that whispers sweet nothings to your taste buds. If you’ve ever experienced the creamy, dreamy magic of cheesecake and the irresistible, nutty charm of cookie butter, then you know this combination is pure genius. These delightful little cups are a fan favorite for so many reasons: they’re perfectly portioned for a guilt-free (or not-so-guilt-free!) treat, they offer an explosion of flavor with every bite, and they’re surprisingly easy to whip up, making them ideal for both impromptu cravings and planned parties. What truly sets these Mini Cookie Butter Cheesecake Cups apart is the exquisite marriage of textures – the buttery, crum extractbly cookie base, the velvety smooth cheesecake filling, and that iconic, spiced cookie butter swirl. They’re miniature masterpieces that pack a serious flavor punch!
Ready to create your own little cups of happiness?
Let’s get baking!
Mini Cookie Butter Cheesecake Cups
Get ready to delight your taste buds with these absolutely divine Mini Cookie Butter Cheesecake Cups! If you’re a fan of that irresistible cookie butter flavor, you’re going to fall head over heels for this recipe. We’re taking the creamy, dreamy goodness of cheesecake and infusing it with the warm, spiced notes of cookie butter, all nestled in a crunchy cookie crust. These little cups are perfect for individual desserts, parties, or just when you need a sweet treat that’s both elegant and incredibly easy to make. They look sophisticated but are surprisingly simple, making them a go-to for any occasion. The combination of the buttery cookie crust, the rich cookie butter cheesecake filling, and the luscious caramel drizzle is simply heavenly. Let’s get started on creating these miniature masterpieces!
Ingredients:
Preparing the Cookie Crust
The foundation of any great cheesecake is a good crust, and for these cookie butter cups, we’re going to make it extra special. The first step is to gather your cookie crum extractbs. You can easily make these by pulsing Biscoff cookies in a food processor until they are finely ground. If you don’t have Biscoff cookies, grabeef ham cracker crum extractbs work wonderfully as a substitute, offering a classic base. Measure out 1 ½ cups of these delicious crum extractbs. In a separate bowl, melt your butter until it’s fully liquid. Pour the melted butter over the cookie crum extractbs. Now, you want to stir this mixture together until all the crum extractbs are evenly moistened. It should resemble wet sand. This butter will help bind the crum extractbs together, creating a firm yet crum extractbly crust once pressed into the cups.
Next, we need to distribute this mixture into our individual dessert cups. You can use mini muffin tins lined with paper liners, small ramekins, or even sturdy paper or foil dessert cups. Spoon about 1 to 1 ½ tablespoons of the cookie crum extractb mixture into the bottom of each cup. Use the back of a spoon or a small tamper to firmly press the crum extractbs down. This is a crucial step for creating a stable base that won’t fall apart when you dig into your cheesecake. Make sure to press them down evenly and create a compact layer. Once all your cups are filled and the crusts are pressed, place them in the refrigerator to chill and set while you prepare the cheesecake filling. This allows the butter to solidify, making the crust firm and ready to hold the creamy filling.
Crafting the Cookie Butter Cheesecake Filling
Now for the star of the show: the cookie butter cheesecake filling! In a large mixing bowl, start by creaming together the softened cream cheese and the cookie butter. It’s essential that your cream cheese is truly softened; this means letting it sit at room temperature for at least an hour, or gently microwaving it for short bursts. Softened cream cheese will incorporate much more smoothly, preventing any lumps in your filling. Beat these two ingredients together with an electric mixer (a stand mixer or hand mixer works perfectly) until they are incredibly smooth and well combined. You should have a creamy, luscious mixture that smells wonderfully of spiced cookies.
Next, gradually add the powdered sugar to the cream cheese and cookie butter mixture. Beat again until it’s fully incorporated and the sugar has dissolved, ensuring a smooth and slightly sweet filling. Now, it’s time to introduce the vanilla extract for that classic cheesecake flavor enhancement. Mix it in until just combined. In a separate, clean bowl, whip the heavy whipping cream until stiff peaks form. Be careful not to over-whip, or you’ll end up with butter! The whipped cream will add airiness and a lighter texture to our cheesecake, making it even more decadent. Gently fold the whipped cream into the cream cheese and cookie butter mixture. Fold it in a few additions, using a spatula, until no streaks of cream cheese remain and the mixture is homogenous and fluffy. Folding rather than beating helps to keep the air in the whipped cream, resulting in a lighter cheesecake.
Assembling and Chilling the Cheesecakes
With your crusts chilled and your filling beautifully prepared, it’s time to bring it all together. Carefully spoon the cookie butter cheesecake filling into each prepared cup, on top of the chilled cookie crust. Fill them generously, but try to keep the tops relatively smooth for a neat presentation. You can use a small offset spatula or the back of a spoon to level the tops. Don’t worry if they aren’t perfectly flat; a slightly rustic look can be charming too!
Once all your cups are filled, it’s time for the crucial chilling phase. Cover the muffin tin or the dessert cups loosely with plastic wrap. Place them in the refrigerator and let them chill for at least 4 hours, or preferably overnight. This extended chilling time is vital for the cheesecakes to set properly. A well-chilled cheesecake will have a firm, creamy texture that’s absolutely divine. Rushing this step will result in a softer, less cohesive dessert. Patience is truly a virtue when it comes to cheesecake!
The Finishing Touches and Serving
The anticnon-alcoholic ipation is almost over! Once your mini cheesecakes are perfectly chilled and set, it’s time to add the final flourishes that will make them truly spectacular. Remove the cheesecakes from the refrigerator. Gently remove them from their liners or ramekins if you used them.
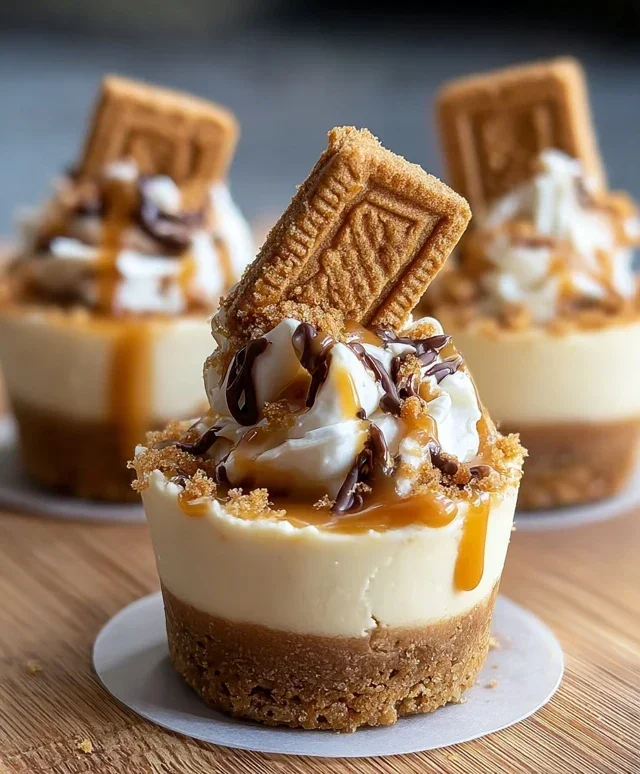
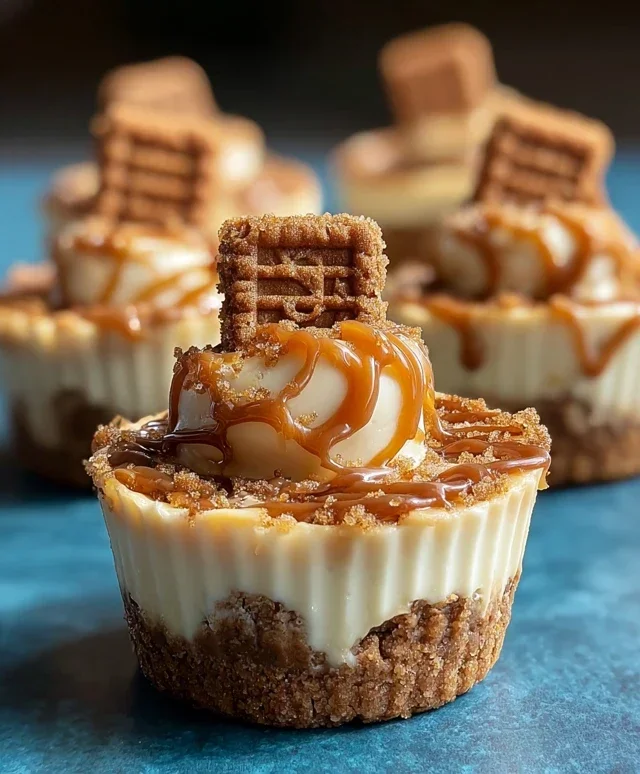
Now, drizzle each mini cheesecake generously with the caramel sauce. You can use a spoon or a squeeze bottle for a more controlled drizzle. The warm, buttery notes of the caramel are the perfect complement to the spiced cookie butter. Next, sprinkle a little extra Biscoff cookie crum extractbs over the top of the caramel. This adds an extra layer of crunch and reinforces that signature cookie butter flavor. Finally, top each mini cheesecake with a dollop of fresh whipped cream. For an extra touch of elegance, place a whole Biscoff cookie on top of the whipped cream as a final garnish. These mini cookie butter cheesecake cups are best served chilled and are sure to be a crowd-pleaser. Enjoy every single delightful bite!
Conclusion:
I hope you’re as excited to whip up these Mini Cookie Butter Cheesecake Cups as I am! This recipe is an absolute winner because it combines the irresistible flavors of creamy cheesecake and decadent cookie butter into perfectly portioned, adorable treats. They’re surprisingly easy to make, making them perfect for a last-minute dessert craving or a crowd-pleasing addition to any gathering. The combination of the buttery cookie crust and the smooth, spiced cookie butter filling is truly divine. Whether you’re a seasoned baker or just starting out, these mini cheesecakes are sure to impress.
For serving suggestions, these little gems are fantastic on their own, but they also shine with a dollop of whipped cream or a drizzle of extra cookie butter. For variations, don’t be afraid to experiment! You could swap out the cookie butter for another nut butter like almond butter or even a fruit butter for a different flavor profile. Adding chocolate chips to the filling or topping with crushed speculoos cookies before serving adds another layer of texture and taste. I genuinely encourage you to give these Mini Cookie Butter Cheesecake Cups a try – they’re a guaranteed hit and so much fun to make!
Frequently Asked Questions:
Can I make these ahead of time?
Absolutely! These mini cheesecakes are perfect for making ahead. I recommend preparing them a day in advance and storing them in an airtight container in the refrigerator. This allows the flavors to meld beautifully and ensures the cheesecake is perfectly set.
How long do they last in the refrigerator?
Stored properly in an airtight container, these Mini Cookie Butter Cheesecake Cups will stay fresh and delicious in the refrigerator for up to 3-4 days. However, I doubt they’ll last that long – they’re usually devoured much quicker!
Can I use a different type of cookie for the crust?
Yes, you can! While speculoos cookies are ideal for that authentic cookie butter flavor, you can certainly substitute them with other crisp cookies like grabeef ham crackers, digestive biscuits, or even shortbread cookies. Just adjust the amount of butter if needed to achieve a crum extractbly consistency.
Mini Cookie Butter Cheesecake Cups
Decadent mini cheesecakes with a cookie butter swirl and Biscoff cookie crust. A delightful no-bake treat perfect for any occasion.
Ingredients
-
1 ½ cups Biscoff cookie crumbs
-
¼ cup melted butter
-
8 oz cream cheese, softened
-
½ cup cookie butter (Biscoff spread)
-
¼ cup powdered sugar
-
½ cup heavy whipping cream
-
1 tsp vanilla extract
-
½ cup caramel sauce
-
Extra Biscoff crumbs
-
Whipped cream
-
Whole Biscoff cookies for garnish
Instructions
-
Step 1
In a small bowl, combine Biscoff cookie crumbs and melted butter. Mix until well combined. Press mixture evenly into the bottoms of 12 mini muffin cups lined with paper liners or greased. -
Step 2
In a medium bowl, beat softened cream cheese and cookie butter until smooth and creamy. -
Step 3
Add powdered sugar and vanilla extract to the cream cheese mixture and beat until well combined. -
Step 4
In a separate bowl, whip heavy cream until stiff peaks form. Gently fold the whipped cream into the cream cheese mixture. -
Step 5
Spoon the cheesecake filling over the cookie crusts in each cup. Drizzle with caramel sauce and swirl gently with a toothpick. -
Step 6
Sprinkle with extra Biscoff crumbs. -
Step 7
Refrigerate for at least 30 minutes, or until firm. Garnish with whipped cream and a whole Biscoff cookie before serving.
Important Information
Nutrition Facts (Per Serving)
It is important to consider this information as approximate and not to use it as definitive health advice.
Allergy Information
Please check ingredients for potential allergens and consult a health professional if in doubt.